Debugger script
Dhtml css
Debugger script
Dhtml css
The FONT element lets you change the color, size, and face of fonts, but the only way to alter the spatial presentation of elements by using margins, padding, and borders is to use tables. The use of tables for layout, however, poses both accessibility and efficiency issues. Styles provide the means to alter the spatial presentation of elements, without sacrificing accessibility and efficiency.
Using styles, you can set margins for any element. For example, use the margin property to set a three-em margin around the document body and use the margin-left and margin-right properties to set one-em left and right margins for the paragraph element (see Figure 8.13):
body { color: navy; background: #ffffcc url(b_whitesand.gif);
margin: 3em; }
p { margin-left: 1em; margin-right: 1em; }
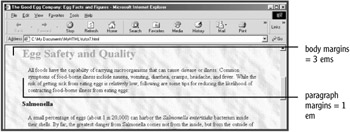
You can also use the margin-top and margin-bottom properties to set margins above and below an element. Notice also that the P element's left and right margins are indented in from the BODY element's left and right margins. Horizontal margins concatenate (are added onto each other), in other words. Vertical margins, on the other hand, collapse to the highest value; thus, if the bottom margin of the preceding element is set to two ems and the top margin of the following element is set to one em, the vertical margin space separating the two elements will be two ems (not three ems).
You can also set different values for each margin. For example, margin: 1em 2em sets top and bottom margins of one em and left and right margins of two ems; margin: 1em 2em 0.5em 3em sets a top margin of one em, a right margin of two ems, a bottom margin of half an em, and a left margin of three ems.
While margins add space outside of an element, padding adds space inside of an element, between the element content and its border. To see this for yourself, for the H2 element, set a light-blue background color and then use the padding property to set 10 pixels of padding around the element's content and the border property to set a lime-colored, 3-pixel, ridged border around the element (see Figure 8.14):
h2 { color: #ff6600; background: #ccffff; padding: 10px;
border: 3px lime ridge; font-size: 2em; }
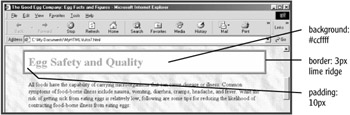
When setting border colors, you can specify any of the 16 standard color names or you can use an RGB hex code. There are eight different border styles that can be specified, including: solid, double, dotted, dashed, groove, ridge, inset, and outset. The default value is none.
You can use the DIV element to display a box around any element or group of elements, even around the whole page. To see how this can be done, first comment out the banner image (to better see the document box) and bracket the document's body elements in a DIV element with a class="box" attribute:
<body> <!-- <p class="banner"><img src="goodegg.gif" width="400" height="267" alt="The Good Egg Company banner image"></p> --> <div class="box"> <h1><span>Egg</span> Facts and Figures</h1> [...] </address> <p>© Copyright 2004 The Good Egg Company. All rights reserved.</p> </div>
Next, revise the body style to reset its margins and add a div.box style to format the box that will be displayed around the document (see Figure 8.15):
body { color: navy; background: #ffffcc url(b_whitesand.gif);
margin: 0em 1em; }
div.box { font-family: Verdana, Arial, Geneva, Helvetica,
sans-serif; font-size: 1.1em; background:
url(b_white_marble.jpg); margin: 1em; padding: 1em; border:
10px #ffcc33 groove; }
p { margin-left: 1em; margin-right: 1em; }
h1 { color: blue; background: transparent; font-size: 42px;
font-family: Arial, Geneva, Helvetica, sans-serif;
text-align: center; margin-top: 0; }
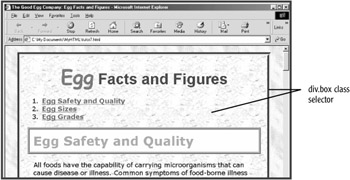
Notice that a top-margin property is added to the h1 style that sets the H1 element's top margin to zero. This is necessary because, while the H1 element's top margin is not displayed if it is at the top of the page, the same is not true if it is nested inside of a DIV element.
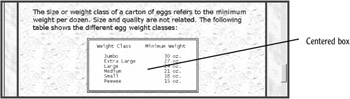
You can also use the DIV element to create a centered box. To try this out, first bracket the PRE element (in the "Egg Sizes" section) with a DIV element with a class="centerbox" attribute and delete the leading spaces inside the PRE element:
<h2><a name="sizes"></a>Egg Sizes</h2>
<p>The size or weight class of a carton of eggs refers to the
minimum weight per dozen. Size and quality are not related.
The following table shows the different egg weight class-
es:</p>
<div class="centerbox">
<pre>
lbWeight Class        Minimum Weight

Jumbo                 30 oz.
Extra Large           27 oz.
Large                 24 oz.
Medium                21 oz.
Small                 18 oz.
Peewee                15 oz.
</pre>
</div>
Next, create a div.centerbox style that sets the width of the element at 250 pixels and centers it by setting the margin-left and margin-right properties to auto. Also, set a "double" border around the division, add padding to the top and right sides of the box, and set a light green background color (see Figure 8.16):
div.centerbox { width: 300px; margin-right: auto; margin-left:
auto; border: 6px blue double; color: navy; background: #ccf-
fcc; font-size: 14px; text-align: center; padding-top: 10px; }
pre { margin-top: 0 }
</style>
You will notice that a text-align: center property is set, which centers the PRE element inside of the "centerbox" division. A 14-pixel font size is set, since browsers are not uniform in the size of font used to display PRE element content (and to protect against a user setting it to a size that will overrun the box). The top margin of the PRE element is also set to zero, since some browsers display a top margin above the PRE element while others don't; instead of setting a top margin, a 10-pixel top-padding amount is set in the "centerbox" division, which is displayed uniformly in browsers.
There are a couple of compatibility issues you need to be aware of when creating centered boxes. Internet Explorer 5.5 for Windows has two significant bugs (or quirks) that impact how the centered box will be displayed in that browser. The first quirk is that IE 5.5 does not recognize the margin-left: auto and margin-right: auto properties for centering the box. The second is that IE 5.5 miscalculates the width of the "centerbox" division by including border and padding amounts in the element width, when they should be excluded from the element width.
A workaround for the first bug is to nest the "centerbox" division inside of another division (a "centerboxout" division, for instance), with a text-align: center property set for the bracketing division.
FIND IT ONLINE
There are two workarounds for the second bug. The first is to create two nested divisions, with the element width set in the outer division and the borders and padding set in the outer division. This has the effect of causing other browsers to display the box at the same width as Internet Explorer 5.5. The second workaround, called "the box model hack," was developed by Tantek Зelik, one of the leaders of the Internet Explorer development team at Microsoft. You can find his page describing how to implement the box model hack at www.tantek.com/CSS/Examples/boxmodelhack.html. The box model hack is sometimes also referred to as "the voice-family hack."
Debugger script
Dhtml css