Debugger script
Dhtml css
Debugger script
Dhtml css
As mentioned previously, many Web publishers choose to use tables to create multi-column page layouts. Although tables do not allow for nonscrolling content (such as a sidebar menu or a banner) that remains visible at all times, they do provide for laying out of pages in columns and rows. One of the benefits of a multi-column page layout is that it gets more key information in your page above the fold (the bottom of the browser's viewport), increasing the chances that visitors will delve further into your page's content. A lot of visitors are liable to click the Back button before scrolling to discover content that is not initially visible.
In this section, you will first be creating a common layout used in Web pages, involving a masthead section running across the top of the page, a sidebar menu running down the left side of the page, and a main content section occupying most of the lower-right area of the page. You will then add a third column (a right sidebar) to the page layout.
The current versions of the Mozilla and Internet Explorer browsers display block elements nested in table cells differently if a full DocType declaration for the transitional definition of HTML 4.01 is used. If a full DocType declaration is used, Mozilla displays vertical spacing above and below a block element nested in a table cell, whereas Internet Explorer does not. There are only two ways to fix this problem: either use a partial DocType declaration for transitional HTML 4.01 (switching the browser into quirks mode) or use styles to eliminate or force the vertical spacing in both browsers. You will learn how to do the latter later in this session. For this example, add a partial DocType declaration for the transitional definition of HTML 4.01:
<!DOCTYPE HTML PUBLIC "-//W3C//DTD HTML 4.01
Transitional//EN">
<html>
Start out by nesting everything inside the BODY element within a table. The table should be set to a width of 100 percent, with a border, padding, and spacing set appropriately:
<body>
<table width="100%" border="1" cellpadding="10"
cellspacing="0">
<p><img src="genealogy.gif" width="500" height="75"
alt="Jane's Genealogy Page"></p>
<h1>Jane's Genealogy Page</h1>

[...]

</address>
</table>
</body>
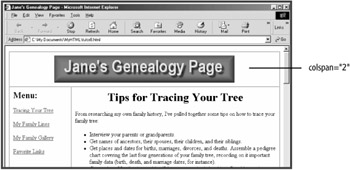
Next, you need to arrange the page's content into three rows and two columns (see Figure 9.1):
<table width="100%" border="1" cellpadding="10"
cellspacing="0">
<tr><td colspan="2">
<p align="center"><img src="genealogy.gif" width="500"
height="75" alt="Jane's Genealogy Page"></p>
</td></tr>
<tr><td width="150" valign="top">
<h2>Menu:</h2>
<p><a href="#tips">Tracing Your Tree</a></p>
<p><a href="#lines">My Family Lines</a></p>
<p><a href="#gallery">My Family Gallery</a></p>
<p><a href="#links">Favorite Links</a></p>
</td><td valign="top">
<h1><a name="tips"></a>Tips for Tracing Your Tree</h1>

[...]

<p>Return to <a href="tutor8.html">Top</a>.</p>
</td></tr>
<tr><td colspan="2">
<address>
<b>Jane Simpson</b><br>
E-Mail: <a href="mailto:jane_s@mycubbyhole.com">jane_s@mycub-
byhole.com</a><br>
Home Page: <a
href="/">http://www.mycubby-
holw.com/~jane_s/</a>
</address>
</td></tr>
</table>
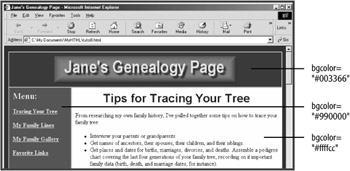
To improve the visual appearance of the table, you can set background colors for the page, the masthead, columns, and address block, as well as foreground colors for text and links (see Figure 9.2):
<body bgcolor="#003333" text="black" link="blue" vlink=
"purple" alink="red">
<table width="100%" border="1" cellpadding="10"
cellspacing="0">
<tr><td colspan="2" bgcolor="#003366">
<p align="center"><img src="genealogy.gif" width="500"
height="75" alt="Jane's Genealogy Page"></p>
</td></tr>
<tr><td width="150" valign="top" bgcolor="#990000">
<h2><font color="aqua">Menu:</font></h2>
<p><a href="#tips"><font color="yellow"><b>Tracing Your
Tree</b></font></a></p>
<p><a href="#lines"><font color="yellow"><b>My Family
Lines</b></font></a></p>
<p><a href="#gallery"><font color="yellow"><b>My Family
Gallery</b></font></a></p>
<p><a href="#links"><font color="yellow"><b>Favorite
Links</b></font></a></p>
</td><td valign="top" bgcolor="#ffffcc">
<h1 align="center"><a name="tips"></a><font color="navy"
face="Arial, Geneva, Helvetica, sans-serif">Tips for Tracing
Your Tree</font></h1>
<p>From researching my own family history, I've pulled
together some tips on how to trace your family tree:</p>
[...]

<li><a href="/">Genealogy Resources on the Internet--Nebraska.</a>
</ul>
<p>Return to <a href="tutor8.html">Top</a>.</p>
</td></tr>
<tr><td colspan="2" bgcolor="#ccffff">
<address>
<font color="navy">
<b>Jane Simpson</b><br>
E-Mail: <a href="mailto:jane_s@mycubbyhole.com">jane_s@mycub-
byhole.com</a><br>
Home Page: <a
href="/">http://www.mycubby-
holw.com/~jane_s/</a>
</font>
</address>
</td></tr>
</table>
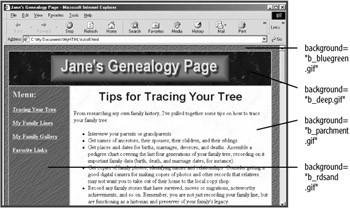
You can further enhance the appearance of your page's layout by setting background images for the page and the table's sections (see Figure 9.3):
<body bgcolor="#003333" background="b_bluegreen.gif"
text="black" link="blue" vlink="purple" alink="red">
<table width="740" border="1" cellpadding="10"
cellspacing="0">
<tr><td colspan="2" bgcolor="#003366" background="b_deep.gif">
<p align="center"><img src="genealogy.gif" width="500"
height="75" alt="Jane's Genealogy Page"></p>
</td></tr>
<tr><td width="150" valign="top" bgcolor="#990000"
background="b_rdsand.gif">
<h2><font color="aqua">Menu:</font></h2>
<p><a href="#tips"><font color="yellow"><b>Tracing Your
Tree</b></font></a></p>
<p><a href="#lines"><font color="yellow"><b>My Family
Lines</b></font></a></p>
<p><a href="#gallery"><font color="yellow"><b>My Family
Gallery</b></font></a></p>
<p><a href="#links"><font color="yellow"><b>Favorite
Links</b></font></a></p>
</td><td valign="top" bgcolor="#ffffcc" background="b_
parchment.gif">
<h1 align="center"><a name="tips"></a><font color="navy"
face="Arial, Geneva, Helvetica, sans-serif">Tips for Tracing
Your Tree</font></h1>

[...]

<p>Return to <a href="tutor8.html">Top</a>.</p>
</td></tr>
<tr><td colspan="2" bgcolor="#ccffff" background=
"b_babyblue.gif">
<address>
<font color="navy">
<b>Jane Simpson</b><br>
E-Mail: <a href="mailto:jane_s@mycubbyhole.com">jane_s@mycub-
byhole.com</a><br>
Home Page: <a
href="/">http://www.mycubby-
holw.com/~jane_s/</a>
</font>
</address>
You should set table background colors that are close to the background images in color and tonality, to account for visitors who are browsing with display of images turned off.
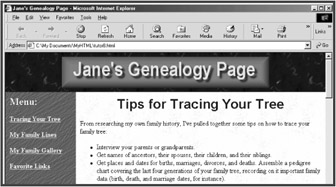
By default, browsers display page margins around the table, which may not be what you want. To eliminate the page margins without using styles, you need to apply a number of non-standard attributes to the page's BODY element. Eliminate the page margins and turn off the table borders (see Figure 9.4):
<body bgcolor="#003333" background="b_bluegreen.gif" text= "black" link="blue" vlink="purple" alink="red" marginheight="0" marginwidth="0" topmargin="0" leftmargin="0"> <table width="100%"border="1" cellpadding="10" cellspacing="0">
| Note |
The current layout creates a dynamic table layout that will expand or contract with the width of the browser's viewport. Some Web designers prefer to create a table layout that remains fixed at a specified width. To do that, just specify a width in pixels for the containing table. For instance, with page margins displayed, a width="750" attribute set in the TABLE element is the maximum width you might set for a table and not cause horizontal scroll bars to be displayed in a browser maximized at 800-Ч-600 resolution. When creating a fixed table layout, it is a good idea to leave the page margins turned on, since the widths of browsers' viewports can differ by several pixels. |
Three-column layouts created using tables are not uncommon on the Web. Rather than reusing the current example, an additional example file, tutor8b_example.html, is included with the example files. It differs in a couple of ways from tutor8_example.html in order to make it easier to create a three-column layout, including shortening the width of the left-side column and changing the UL element in the last content section to paragraphs (so it will fit better in the new right-side column). The loop-back links at the section ends have also been changed to target the new example file. To get started creating this example:
Open tutor8b_example.html in your text editor from your MyHTML folder (located in your My Documents folder, if using Windows, or on your Desktop, if using a Macintosh).
Resave tutor8b_example.html as tutor8b.html in the MyHTML folder.
Open tutor8b.html in your browser.
Since the table is going to include three columns, you need to change any instances of colspan="2" to colspan="3":
<table width="100%" cellpadding="10" cellspacing="0">
<tr><td colspan="3" bgcolor="#003366" background="b_deep.gif">
<p align="center"><img src="genealogy.gif" width="500"
height="75" alt="Jane's Genealogy Page"></p>
</td></tr>

[...]

<tr><td colspan="3" bgcolor="#ccffff"
background="b_babyblue.gif">
<address>
Now you just need to add a third column to the table's second row (see Figure 9.5):
<ul>
<li><a href="simpson_gallery.html">Simpson Family Gallery</a>
<li><a href="bannock_gallery.html">Bannock Family Gallery</a>
<li><a href="peterson_gallery.html">Peterson Family
Gallery</a>
<li><a href="wilson_gallery.html">Wilson Family Gallery</a>
</ul>
<p>Return to <a href="tutor8b.html">Top</a>.</p>
</td>
<td width="125" valign="top" bgcolor="#ffcccc" background=
"b_pink.gif">
<h2><a name="links"</a>Favorite Links</h2>
<p>Here are some of my favorite links to genealogy resources
on the Web:</p>
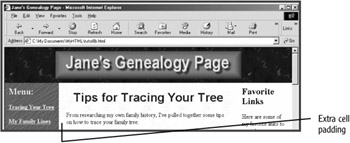
One of the problems that can arise when creating page layouts using tables is that cell padding can only be set for the whole table, and not for separate cells within the table. There are two ways to deal with this. The first involves using styles (you'll learn to do that later in this session), whereas the second involves using nested tables. For this example, use a nested table to vary cell padding in the layout table's main content cell (see Figure 9.6):
<p><a href="#links"><font color="yellow"><b>Favorite
Links</b></font></a></p>
</td>
<td valign="top" bgcolor="#ffffcc" background=
"b_parchment.gif">
<table width="100%" cellpadding="10" cellspacing="0">
<tr><td>
<h1 align="center"><a name="tips"></a><font color="navy"
face="Arial, Geneva, Helvetica, sans-serif">Tips for Tracing
Your Tree</font></h1>

[...]

<ul>
<li><a href="simpson_gallery.html">Simpson Family Gallery</a>
<li><a href="bannock_gallery.html">Bannock Family Gallery</a>
<li><a href="peterson_gallery.html">Peterson Family
Gallery</a>
<li><a href="wilson_gallery.html">Wilson Family Gallery</a>
</ul>
<p>Return to <a href="tutor8b.html">Top</a>.</p>
</td></tr>
</table>
</td>
<td width="125" valign="top" bgcolor="#ffcccc"
background="b_pink.gif">
<h2><a name="links"</a>Favorite Links</h2>
<p>Here are some of my favorite links to genealogy resources
on the Web:</p>
Up until this point, you've used spanned columns in creating a table-based page layout, but you haven't used spanned rows. Set up the table so the first column spans two rows, while the bottom row spans two columns (see Figure 9.7):
<table width="100%" cellpadding="10" cellspacing="0">
<tr><td colspan="3" bgcolor="#003366" background="b_deep.gif">
<p align="center"><img src="genealogy.gif" width="500"
height="75" alt="Jane's Genealogy Page"></p>
</td></tr>
<tr><td width="125" valign="top" bgcolor="#990000" background=
"b_rdsand.gif" rowspan="2">
<h2><font color="aqua">Menu:</font></h2>

[...]

</td></tr>
<tr><td colspan="2" bgcolor="#ccffff" background=
"b_babyblue.gif">
<address>
Debugger script
Dhtml css