JavaScript Validator
JavaScript Editor
JavaScript Validator
JavaScript Editor
So far in this chapter, we have been looking at frames and scripting between them. In this section, we'll change direction slightly and look at how you can open up additional browser windows.
Why would we want to bother opening up new windows? Well, they can be useful in all sorts of different situations, such as the following:
You might want a page of links to websites where clicking a link opens up a new window with that website in it.
Additional windows can be useful for displaying information. For example, if you had a page with products on it, the user could click a product image, and a new small window would pop up with details of that product. This can be less intrusive for browsing products than navigating the existing window to a new page with product details, and then requiring the user to click Back to return to the list of products. We'll be creating an example demonstrating this.
Dialog windows can be very useful for obtaining information from a user, although overuse can annoy the user.
| Note |
Something we do need to be aware of is that some users have programs installed to block popup windows, and the latest version of Netscape also allows the user to switch off the ability to open new windows. |
The window object has an open() method, which opens up a new window. It takes three parameters, although the third is optional, and it returns a reference to the window object of the new browser window.
The first parameter of the open() method is the URL of the page that you want to be opened in the new window. However, if you wish, you can pass an empty string for this parameter and get a blank page, then use the document.write() method to insert HTML into the new window dynamically. We will give an example of this later.
The second parameter is the name we want to allocate to the new window. This is not the name we use for scripting, but instead is used for the target attribute of things such as hyperlinks and forms. For example, if we set this parameter to myWindow and set a hyperlink on the original page to
<A href="test3.htm" TARGET=myWindow>Test3.htm</A>
then clicking that hyperlink will cause the hyperlink to act on the new window opened. By this I mean that test3.htm will be loaded into the new window and not the current window. The same applies to the <form> tag's target attribute, which we'll be looking at in the chapters on server-side JavaScript. In this case, if a form is submitted from the original window, the response from the server can be made to appear in the new window.
When a new window is opened, it is opened (by default) with a certain set of properties, such as width and height, and with the normal browser window features. Browser window features include things such as a location entry field or a menu bar with navigation buttons.
The third parameter of the open() method can be used to specify values for the height and width properties. Also, since by default most of the browser window features are switched off, we can switch them back on using the third parameter of the open() method. We'll look at browser features in more detail shortly.
Let's first look at an example of the code we need to open a basic window. We'll name this window myWindow and give it a width and height of 250 pixels. We want the new window to open with the test2.htm page inside.
var newWindow;
newWindow = window.open("test2.htm","myWindow","width=250,height=250");
You can see that test2.htm has been passed as the first parameter; that is the URL of the page we want to open. We've named the window myWindow in the second parameter. In the third parameter, we've set the width and height properties to 250.
You'll also notice that we've set the variable newWindow to the return value returned by the open() method, which is a reference to the window object of the new window just opened. We can now use newWindow to manipulate the new window and gain access to the document contained inside it using the window.document property. We can do everything with this reference that we did when dealing with frames and their window objects. For example, if we wanted to change the background color of the document contained inside the new window, we would type
newWindow.document.bgColor = "RED";
How would we close the window we just opened? Easy, we just use the window object's close() method like this:
newWindow.close();
Let's look at the example we mentioned earlier of a products page where clicking a product brings up a window with details of that product. In a shameless plug, we'll be using a couple of Wrox books as examples, though, with just two products on our page, it's not exactly the world's most extensive online catalog.
<html>
<head>
<title>Online Books</title>
<script language="JavaScript">
var detailsWindow;
function showDetails(bookURL)
{
   detailsWindow = window.open(bookURL,"bookDetails","width=400,height=350");
   detailsWindow.focus();
   return false;
}
</script>
</head>
<body>
<h2 align=center>Online Book Buyer</h2>

<p>
Click any of the images below for more details
</p>
<strong>Professional Active Server Pages .Net</strong>
<br>
<A name="proASPLink" href=""
   onclick="return showDetails('pro_asp_details.htm')">
      <img src="pro_asp.gif" border=0>
</A>
<br><br>
<strong>Beginning Dreamweaver MX</strong>
<br>
<A name="begDreamweaverLink" href=""
   onclick="return showDetails('beg_dreamweaver_details.htm')">
      <img src="beg_dreamweaver.gif" border=0>
</A>
</body>
</html>
Save this page as online_books.htm. You'll also need to create two images and name them pro_asp.gif and beg_dreamweaver.gif. Alternatively, you can find these files in the code download. Note that if the user has disabled JavaScript, the window won't be opened. We can get around this by adding the page details to the href attribute as follows:
<a href="pro_asp_details.htm"
      onclick="return showDetails(this.href);"><img ...></a>
We now need to create the two details pages, both plain HTML.
<html>
<head>
<title>Professional ASP.NET 1.0, Special Edition</title>
</head>
<body>
<strong>Professional ASP.NET 1.0, Special Edition</strong>
<br>
Subjects
<br>
ASP
<br>
Internet
<br>
<HR color=#cc3333>
<p><strong>Book overview</strong> </p>
<p>This comprehensive compendium provides a broad and thorough
  investigation of all aspects of programming with ASP.NET. Entirely revised
  and updated for the 1.0 Release of .NET, this book will give you the information
  you need to master ASP.NET and build dynamic, successful, enterprise Web applications.
</p>
</body>
</html>
Save this as pro_asp_details.htm.
<html>
<head>
<title>Beginning Dreamweaver MX</title>
</head>
<body>
<strong>Beginning Dreamweaver MX</strong>
<br>
<strong>Subjects</strong>
   Dreamweaver<br>
   Internet<br>
   Web Design<br>
   XML and Scripting<br>
<HR color=#cc3333>
<p><strong>Book overview<strong></p>
<p>With this book you'll quickly be creating powerful,
dynamic web sites with Dreamweaver MX - the latest version of
Macromedia's powerful, integrated web development and editing tool.
You'll learn how to use the tools and features of
Dreamweaver to construct three complete sites using
HTML, JavaScript, Active Server Pages (ASP), and databases.
</p>
</body>
</html>
Save the final page as beg_dreamweaver_details.htm.
Load online_books.htm into your browser and click either of the two images. A new window with the book's details should appear above the existing browser window. Click the other book image, and the window will be replaced by one with details of that book.
| Note |
Note that on IE 4, if you open one book's details window without closing a previous details window, the focus is kept with the opening window. In other words, the opening window is above the opened details window. |
The files pro_asp_details.htm and beg_dreamweaver _details.htm are both plain HTML files, so we won't look at them. However, in online_books.htm we find some scripting action, which we will look at here.
In the script block at the top of the page, we first define a variable detailsWindow.
var detailsWindow;
We then have the function that actually opens the new windows.
function showDetails(bookURL)
{
   detailsWindow = window.open(bookURL,"bookDetails","width=400,height=350");
   detailsWindow.focus();
   return false;
}
This function is connected to the onclick event handlers of the two hyperlinks surrounding the book images that appear later in the page. The parameter bookURL is passed by the code in the onclick event handler and will be either beg_asp3_details.htm or prof_js_details.htm.
We create the new window with the window.open() method. We pass the bookURL parameter as the URL to be opened. We pass bookDetails as the name we want applied to the new window. If the window already exists, another new window won't be opened, and the existing one will be navigated to the URL that we pass. This only occurs because we are using the same name (bookDetails) when opening the window for each book. If we used a different name, a new window would be opened.
By storing the reference to the window object just created in the variable detailsWindow, we can access its methods and properties. On the next line, you'll see that we use the window object, referenced by detailsWindow, to set the focus to the new window—otherwise it will appear behind the existing window.
Finally, we need to return false so that the normal action of the hyperlink is canceled.
Although it's the user's action of clicking the images that we're interested in, we need to wrap the images in a hyperlink tag and use the onclick event associated with the A object because under Netscape 4 img objects don't have an onclick event handler. You can see this in the following code, where we create the images and hyperlinks and connect the onclick event handlers to our function. Although we are using the same function for each of the links' onclick event handlers, we pass a different parameter, namely the URL of the details page for that book.
<strong>Beginning Active Server Pages 3</strong>
<br>
<A name="begASPLink" href=""
   onclick="return showDetails(pro_asp_details.htm')">
      <img src="beg_asp3.gif" border=0>
</A>
<br><br>
<strong>Professional JavaScript</strong>
<br>
<A name="profJSLink" href=""
   onclick="return showDetails('beg_dreamweaver_details.htm')">
      <img src="prof_js.gif" border=0>
</A>
We mentioned earlier that we can pass an empty string as the first parameter of the window object's open() method and then write to the page using HTML. Let's see how we would do that.
First, we need to open a blank window by passing an empty value to the first parameter that specifies the file name to load.
var newWindow = window.open("","myNewWindow","width=150,height=150");
Now we can open the window's document to receive our HTML.
newWindow.document.open();
This is not essential when a new window is opened because the page is blank, but with a document that already contains HTML, it has the effect of clearing out all existing HTML and blanking the page, making it ready for writing.
Now we can write out any valid HTML using the document.write() method.
newWindow.document.write("<h4>Hello</h4>")
newWindow.document.write("<p>Welcome to my new little window</p>")
Each time we use the write() method, the text is added to what's already there until we use the document.close() method.
newWindow.document.close()
If we then use the document.write() method again, the text passed will replace existing HTML rather than adding to it.
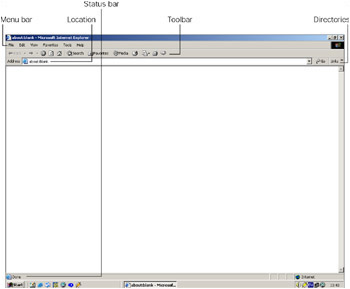
As we have seen, the window.open() method takes three parameters, and it's the third of these parameters that we'll be looking at in this section. Using this third parameter, you can control things such as the size of the new window created, its start position on the screen, whether the user can resize it, whether it has a toolbar, and so on.
Features such as menu bar, status bar, and toolbar can be switched on or off using yes or 1 for on and no or 0 for off. To switch them on, we can also just include their name without specifying a value.
The list of possible options shown in the following table is not complete, and not all of them work with both IE and NN browsers.
|
Window Feature |
Possible Values |
Description |
|---|---|---|
|
copyHistory |
yes, no |
Copy the history of the window doing the opening to the new window |
|
directories |
yes, no |
Show directory buttons |
|
height |
integer |
Height of new window in pixels |
|
left |
integer |
Window's left starting position in pixels |
|
location |
yes, no |
Show location text field |
|
menubar |
yes, no |
Show menu bar |
|
resizable |
yes, no |
User can resize the window once opened |
|
scrollbars |
yes, no |
Show scrollbars if page too large to fit in window |
|
status |
yes, no |
Show status bar |
|
toolbar |
yes, no |
Show toolbar |
|
top |
integer |
Window's top starting position in pixels |
|
width |
integer |
Width of new window in pixels |
As mentioned earlier, this third parameter is optional. If you don't include it, all the window features default to yes, except the window's size and position properties, which default to a set position and size. For example, if you try this code:
<html>
<head>
<script language=JavaScript>
var newWindow;
newWindow = window.open("","myWindow");
</script>
</head>
</html>
you'll see a window something like the one shown in Figure 7-10.
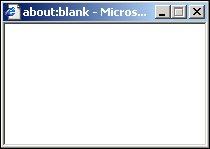
However, if you specify even one of the features, all the others (except size and position properties) are set to no by default. For example
var newWindow;
newWindow = window.open("","myWindow","width=200,height=120")
produces a window with no features, as shown in Figure 7-11, although we have defined its size this time. The larger window is the original page, and the smaller one on top is the popup window.
Let's see another example. The following creates a 250-by-250-pixel window, with a location and menu bar, and which is resizable.
var newWindow;
newWindow =
window.open("","myWindow","width=250,height=250,location,menubar,resizable")
A word of warning, however: Never include spaces inside the features string; otherwise Netscape browsers will consider it invalid and ignore your settings.
We've taken a brief look at how we can manipulate the new window's properties and methods, and access its document object using the return value from the window.open() method. Now, we're going to look at how the newly opened window can access the window that opened it and, just as with frames, how it can use functions there.
The key to accessing the window object of the window that opened the current window is the window object's opener property. This returns a reference to the window object of the window that opened the current window. So
window.opener.document.bgColor = "RED"
will change the background color of the opener window to red. We can use the reference pretty much as we used the window.parent and window.top properties when using frames.
Let's look at an example where we open a new window and access a form on the opener window from the new window:
<html>
<head>
<script language=JavaScript>
var newWindow;
function butOpenWin_onclick()
{
   var winTop = (screen.height / 2) - 125;
   var winLeft = (screen.width / 2) - 125;
   var windowFeatures = "width=250,height=250,";
   windowFeatures = windowFeatures + "left=" + winLeft + ",";
   windowFeatures = windowFeatures + "top=" + winTop;
   newWindow = window.open("newWindow.htm","myWindow",windowFeatures);
}
function butGetText_onclick()
{
   if (typeof(newWindow) == "undefined" || newWindow.closed == true)
   {
      alert("No window is open");
   }
   else
   {
      document.form1.text1.value = newWindow.document.form1.text1.value;
   }
}

function window_onunload()
{
   if (typeof(newWindow) != "undefined" && newWindow.closed == false)
   {
         newWindow.close();
   }
}

</script>
</head>
<body onunload="window_onunload()">
<form name=form1> <input type="button" value="Open newWindow" name=butOpenWin
   onclick="butOpenWin_onclick()"> <br><br> NewWindow's Text <br>
<input type="text" name=text1>
<br> <input type="button" value="Get Text" name=butGetText
   onclick="return butGetText_onclick()">
</form>
</body>
</html>
This is the code for our original window. Save it as openerwindow.htm. Now we'll look at the page that will be loaded by the opener window.
<html>
<head>
<script language=JavaScript>
function butGetText_onclick()
{
   document.form1.text1.value = window.opener.document.form1.text1.value;
}
</script>
</head>
<body>
<form name=form1>
Opener window's text<BR>
<input type="text" name=text1>
<br>
<input type="button" value="Get Text" name=butGetText language=JavaScript
   onclick="butGetText_onclick()">
</form>
</body>
</html>
Save this as newWindow.htm.
Open openerwindow.htm in your browser, and you'll see a page with the simple form shown in Figure 7-12.
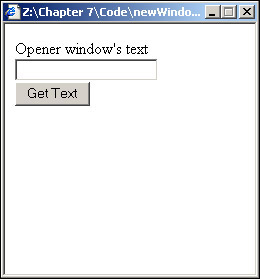
Click the Open newWindow button, and you'll see the window shown in Figure 7-13 open above the original page.
Type something into the text box of the new window. Then return to the original opener window, click the Get Text button, and you'll see what you just typed into newWindow appear in the text box on the opener window's form.
Change the text in the opener window's text box and then return to the newWindow and click the Get Text button. The text you typed into the opener window's text box will appear in newWindow's text box.
Let's look at the opener window first. In the head of the page is a script block in which a variable and three functions are defined. At the top, we have declared a new variable, newWindow, which will hold the window object reference returned by the window.open() method we'll use later. Being outside any function gives this variable a global scope, so we can access it from any function on the page.
var newWindow;
Then we have the first of the three functions in this page, butOpenWin_onclick(), which is connected further down the page to the Open newWindow button's onclick event handler. Its purpose is simply to open the new window.
Rather than have the new window open up anywhere on the page, we use the built-in screen object, which is a property of the window object, to find out the resolution of the user's display and place the window in the middle of the screen. The screen object has a number of read-only properties, as you can see in Appendix B, but we're interested in the width and height properties. We initialize the winTop variable to the vertical position on-screen where we want the top edge of the popup window to appear. The winLeft variable is set to the horizontal position on-screen where we want the left edge of the popup window to appear. In this case, we want the position to be in the middle of the screen both horizontally and vertically.
function butOpenWin_onclick()
{
   var winTop = (screen.height / 2) - 125;
   var winLeft = (screen.width / 2) - 125;
We build up a string for the window features and store it in the windowFeatures variable. We set the width and height to 250 and then use the winLeft and winTop variables we just populated to create the initial start positions of the window.
   var windowFeatures = "width=250,height=250,";
   windowFeatures = windowFeatures + "left=" + winLeft + ",";
   windowFeatures = windowFeatures + "top=" + winTop;
Finally, we open the new window, making sure we put the return value from window.open() into global variable newWindow so we can manipulate it later.
   newWindow = window.open("newWindow.htm","myWindow",windowFeatures);
}
The next function is used to obtain the text from the text box on the form in newWindow.
In this function we use an if statement to check two things. First, we check that newWindow is defined and second, that the window is actually open. The reasons for checking are that we don't want to try to access a non-existent window, for example if no window has been opened or a window has been closed by the user. The typeof operator returns what type of information is held in a variable, for example number, string, Boolean, object, and undefined. Undefined is returned if the variable has never been given a value, as newWindow won't have been if no new window has been opened.
Having confirmed that a window has been opened at some point, we now need to check whether it's still open, and the window object's closed property does just that. If it returns true, the window is closed, and if it returns false, it's still open. (Do not confuse this closed property with the close() method we saw previously.)
In the if statement you'll see that checking if newWindow is defined comes first, and this is no accident. If newWindow really were undefined, newWindow.closed would cause an error, because there is no data inside newWindow. However, we are taking advantage of the fact that if an if statement's condition will be true or false at a certain point regardless of the remainder of the condition, then the remainder of the condition is not checked.
function butGetText_onclick()
{
   if (typeof(newWindow) == "undefined" || newWindow.closed == true)
   {
      alert("No window is open");
   }
If newWindow exists and is open, the else statement's code will execute. Remember that newWindow will contain a reference to the window object of the window opened. This means we can access the form in newWindow, just as we'd access a form on the page the script's running in, by using the document object inside the newWindow window object.
   else
   {
      document.form1.text1.value = newWindow.document.form1.text1.value;
   }
}
The last of the three functions is window_onunload(), which is connected to the onunload event of this page and fires when either the browser window is closed or the user navigates to another page. In the window_onunload() function, we check to see if newWindow is valid and open in much the same way as we just did. We must check to see if the newWindow variable is defined first. With the && operator, JavaScript only checks the second part of the operation if the first part evaluates to true. If newWindow is defined, and does therefore hold a window object (even though it's possibly a closed window), we can check the closed property of the window. However, if newWindow is undefined, the check for its closed property won't happen, and no errors will occur. If we checked the closed property first and newWindow was undefined, an error would occur since an undefined variable has no closed property.
function window_onunload()
{
   if (typeof(newWindow) != "undefined" && newWindow.closed == false)
   {
         newWindow.close();
   }
}
If newWindow is defined and open, we close it. This prevents the newWindow's Get Text button being clicked when there is no opener window in existence to get text from (since this function fires when the opener window is closed).
Let's now look at the code for the page that will be loaded in our newWindow, namely newWindow.htm. This page contains one function, butGetText_onclick(). This is connected to the onclick event handler of the Get Text button in the page and is used to retrieve the text from the opener window's text box.
function butGetText_onclick()
{
   document.form1.text1.value = window.opener.document.form1.text1.value;
}
In this function, we use the window.opener property to get a reference to the window object of the window that opened this one and then use that reference to get the value out of the text box in the form in that window. This value is placed inside the text box in the current page.
Before we leave the subject of windows, let's look at the methods available to us for resizing and moving existing windows. Note that Netscape 6/7 can be configured to not allow scripts to resize or move existing windows.
Once you have opened a window, you can change its position on-screen and its size using the window object's resizeTo() and moveTo() methods, both of which take two arguments in pixels.
Let's imagine, having just opened a new window, like this:
var newWindow = window.open(myURL,"myWindow","width=125,height=150,resizable");
that you want to make it 350 pixels wide by 200 pixels high and move it to a position 100 pixels from the left of the screen and 400 pixels from the top. What code would you need?
newWindow.resizeTo(350,200);
newWindow.moveTo(100,400);
You can see that we can resize our window to 350 pixels wide by 200 pixels high using resizeTo(). Then we move it so it's 100 pixels from the left of the screen and 400 pixels from the top of the screen using moveTo().
The window object also has resizeBy() and moveBy() methods. These each take two parameters, in pixels. For example
newWindow.resizeBy(100,200);
will increase the size of newWindow by 100 pixels horizontally and 200 pixels vertically. Similarly
newWindow.moveBy(20,50);
will move the newWindow by 20 pixels horizontally and 50 pixels vertically.
When using these methods, you must bear in mind that users can manually resize these windows if they so wish. In addition, the size of the client's screen in pixels will vary between users.
JavaScript Validator
JavaScript Editor