Installing MySQL on Macintosh
Mac OS X uses a FreeBSD (Unix) foundation with a Macintosh graphical user interface, meaning that it has the usability and stability of any Unix operating system but the appearance and interface of a Mac. The implication of this is that, now more than ever, there is an Apple operating system that programmers and developers are actively using. Furthermore, most software that installs and runs on a Unix system, such as MySQL, will also work with Mac OS X.
MySQL is available for Mac OS X 10.2 (aka Jaguar) and later in a precompiled binary package. It's quite easy to use, but I'll run through it nonetheless. Note that the server version of Mac OS X comes with MySQL preinstalled, so you will need to perform an update, not an installation, if you are running Mac OS X Server. See later in this chapter for update-specific instructions.
MySQL will be installed in the /usr/local/mysql-VERSION directory, where VERSION is the full version name and number (e.g., max-5.0.18-osx10.4-powerpc). A symbolic link is then created so that /usr/local/mysql can be used as a shortcut to /usr/local/mysql-VERSION. The folder layout within this directory is represented in Table 1.2.
Table 1.2. After installing MySQL, you'll have these folders (all found within the main MySQL folder).MySQL Layout on Mac OS X |
|---|
Subfolder | Contains |
|---|
bin | All applications | data | Databases and logs | docs | Documentation | include | Header files | lib | Code libraries | man | Unix man pages | scripts | The mysql_install_db script | share/mysql | Error message files | sql-bench | Benchmark utilities |
To install MySQL on Mac OS X:
1. | Download the current package from the MySQL Web site.
Start by pointing your browser to http://dev.mysql.com/downloads. Then click the name of the version you'll want. As of the time of this writing, the most current stable release of MySQL is version 5.0.18.
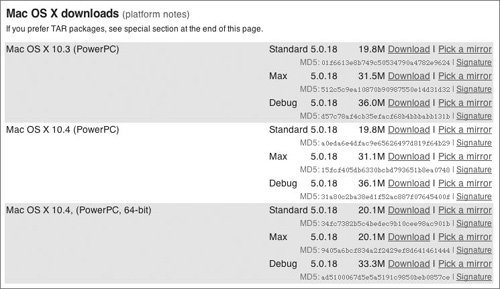
On the next page, you'll be able to choose which binary you want ( Figure 1.9). MySQL recommends the Standard version, but I'd recommend the Max version if you want to learn it all and have the disk space to spare. Make sure you also are picking from the area that matches your version of Mac OS X.
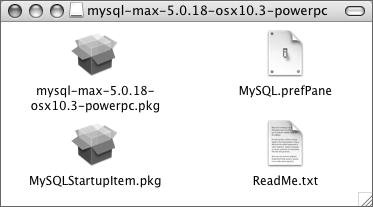
| 2. | Mount the .dmg file.
The downloaded file is of type .dmg, a common disk image. Just double-click it to mount the disk so that you may begin the installation process. The result will be a folder of things like that shown in Figure 1.10.
| 3. | Install MySQL.
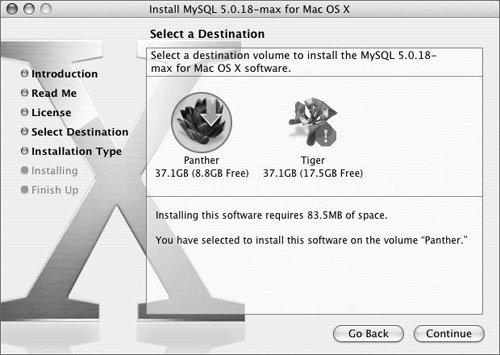
Double-click the MySQL packagethe thing called something like mysql-version-os-powerpc.pkgand follow through its steps. Apart from choosing the destination ( Figure 1.11), which applies only if you have more than one volume, the installation is mindless.
| | | 4. | Install the System Preferences pane by double-clicking the MySQL.prefPane item (see Figure 1.10).
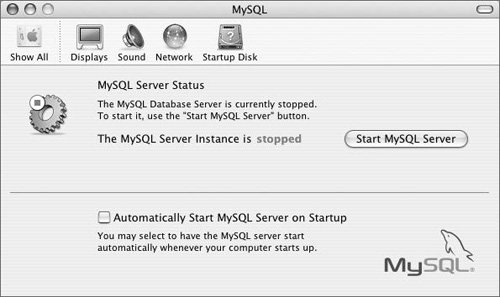
The MySQL System Preferences pane is an easy way to control MySQL ( Figure 1.12). To install it, just double-click the item and your Mac will do the rest.
| 5. | If you want, run the MySQLStartupItem.pkg (see Figure 1.10).
By running this installer, a script will be added that automatically starts MySQL every time you start your Mac. This functionality is duplicated by checking the appropriate box in the System Preferences panel (see Figure 1.12).
| 6. | Start MySQL and assign a password to MySQL's root user.
You'll learn how to do these two steps in Chapter 2.
|
 Tips Tips
The installation of MySQL on the Mac has been greatly simplified. You no longer need to take such steps as creating a separate MySQL user. According to MySQL, there is a bug in the Apple package installer program, which may result in an error that states "You cannot install this software on this disk" on the destination disk selection page (Figure 1.11). If you see this, click Go Back, then click Continue to return to the destination disk selection page, and you should be fine.
|
 Js editor
Website development
Js editor
Website development