JavaScript Editor
JavaScript Debugger
JavaScript Editor
JavaScript Debugger|
| ||
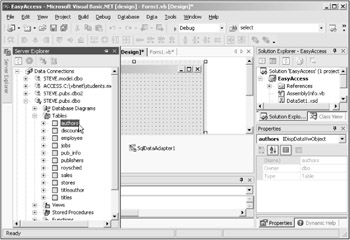
To work with a database, you need a connection to that database. In Visual Basic, the Server Explorer lets you work with connections to various data sources. To display the Server Explorer if it's not already visible, use the View|Server Explorer menu item, or press Ctrl+Alt+S. You can see the Server Explorer in Figure 20.3, where I've docked it to the left edge of the Visual Basic IDE (by clicking the thumbtack icon). This tool lets you create and examine data connections, including connections to Web servers; you can see connections to various databases in the Server Explorer already.
| Tip |
When Visual Basic .NET is installed, it searches your local computer for database servers and adds them to the Server Explorer automatically. To add additional servers to the Server Explorer, you select the Tools|Connect to Server menu item or right-click the Servers node that appears at the bottom of the Server Explorer, and select the Add Server menu item. This opens the Add Server dialog, which lets you enter new database servers by computer name or IP address on the Internet. When you subsequently create data connections, you can specify what server to use, as you see in the drop-down list box in Figure 20.4. |
In the EasyAccess example, I'm going to display the data from the authors table in the Microsoft SQL Server's pubs sample database, so we'll need a connection to that database. (I'll use the pubs database frequently in this and the next few chapters to make it easy to get the example code on the CD-ROM to work on your own machine, because all you'll need is a connection to that one database to run the examples; see the readme file on the CD-ROM for more information.)
| Tip |
A red X over a database's icon in the Server Explorer means a connection is closed; you can open the connection by clicking the plus sign (+) next to the connection in the Server Explorer. |
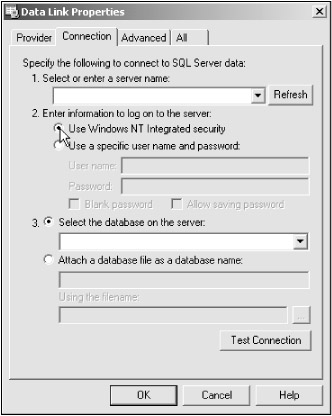
To create that connection, right-click the Data Connections icon in the Server Explorer and select the Add Connection item, or use the Tools|Connect to Database menu item. Doing so opens the Data Link Properties dialog you see in Figure 20.4.
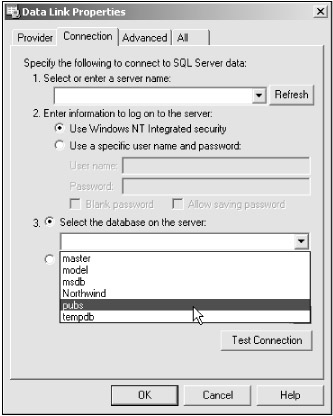
In the Data Link Properties dialog, you can enter the name of the server you want to work with, as well as your login name and password, if applicable. (Here, I'm going to use Windows NT integrated security, because SQL Server is on the same machine as VB .NET in my case, but you can choose a server name and enter a user name and password in the Data Link Properties dialog, if you prefer.) You can choose a database already on the server with the "Select the database on the server" option, or another database file with the "Attach a database file as a database name" option. In this case, we'll use the pubs example database that comes with SQL Server, so select the first option here and choose the pubs database, as you see in Figure 20.5.
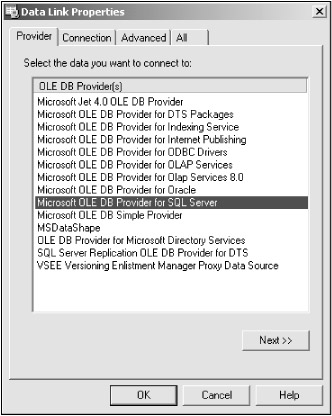
What if you're not using SQL Server, but, say, Oracle to connect to a database? In that case, you click the Provider tab in the Data Link Properties dialog, as you see in Figure 20.6, and select the type of provider you're working with—Oracle, MS Jet, and so on (the default is SQL Server). Then you go back to the Connection tab and choose the specific database file you want to work with. For an example, see "Connecting to an MS Jet Database" in this chapter.
When you've specified the database file to work with, click the Connection tab and the Test Connection button you see in Figure 20.5. If the connection is working, you'll see a message box with the message "Test connection succeeded" (and if not, a message box will appear, explaining what went wrong).
When the connection is set, click the OK button to close the Data Link Properties dialog. Doing so adds a new connection to the pubs database to the Server Explorer, as you see in Figure 20.3. You can open that connection (assuming, in this case, that SQL Server is running) and take a look what tables are in the database, as you also see in Figure 20.3. Our data connection is ready to work with. Note that this connection is now part of your Visual Basic working environment; it's not specific to the application you're working on at the moment. You can access this connection in the Server Explorer at any time, even when working on other applications.
| Tip |
To delete a data connection, just right-click it in the Server Explorer and select the Delete menu item. |
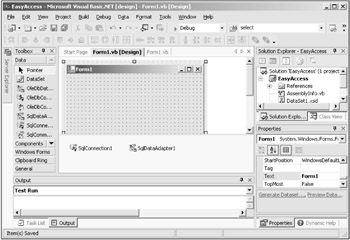
In this example, we want to display the data in the authors table of the pubs database, and this is where the Server Explorer makes life easy for us. To create both the data connection and adapter objects we'll need to work with this table, just drag the authors table onto the main form. This automatically creates the SqlConnection1 and SqlDataAdapter1 objects you see in the component tray in Figure 20.7. (If we had been working with another data provider, Visual Basic would have created OleDbConnection1 and OleDbDataAdapter1 objects.)
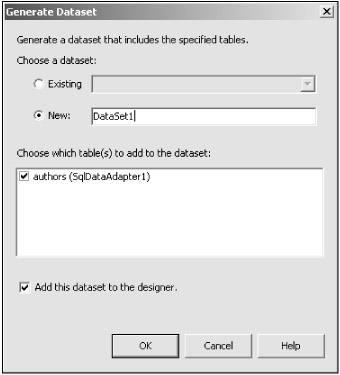
That was easy enough—Visual Basic created the data connection and data adapter objects we need. (Note that in this case we wanted the whole authors table, which means we could simply drag that table onto a form. If we wanted to work with only specific fields, we'd have to generate an SQL query in a data adapter object ourselves, and we'll do that by dragging a data adapter onto a form in the next example.) Now it's time to generate the dataset that holds the data from the data adapter. To do that, just select the Data|Generate Dataset menu item, or right-click SqlDataAdapter1 and select the Generate Dataset menu item. This displays the Generate Dataset dialog you see in Figure 20.8.
| Tip |
If the Data menu is not showing, click the main form in the application to bring it up—this menu only appears when a target that can contain data objects is visible in a designer. |
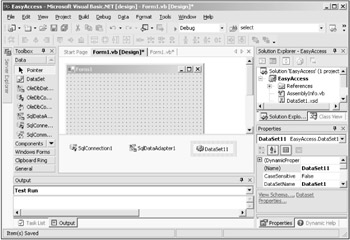
In this case, click the New option to create a new dataset. I'll stick with the default name given to this new dataset object, DataSet1, as you see in the figure; make sure the authors table checkbox is checked, as well as the "Add this dataset to the designer" checkbox, then click OK. Doing so adds a new dataset, DataSet11, to the form designer's component tray, as you see in Figure 20.9. This is the dataset we'll work with.
| Tip |
You can get an immediate look at the data in the dataset by clicking the dataset object, DataSet11, selecting the Data|Preview Data menu item, and then clicking the Fill DataSet button. This will display all the data in the authors table in a dialog box. This data preview feature is great, and one you will find yourself using a lot. See "Previewing Data from Data Adapters" in this chapter for more details. |
To display the data in the dataset, I'll use a data grid control, which we'll see more of in the next chapter (see "Using the DataGrid Class" in Chapter 21). This control is designed to display entire database tables, so find the DataGrid tool in the Window Forms tab in the toolbox, and drag a new data grid to the main form, sizing it to fit the form. (You can use its Dock property to make that sizing easy if you prefer.)
Set the data grid's DataSource property to Data11 (not DataSet11.authors, which also will be displayed as an option in the Properties window), and its DataMember property to authors, which will be displayed automatically as an option when you click that property. This connects the data in the dataset to the data grid.
We're almost done. The final step (which wasn't necessary in Visual Basic 6.0 or earlier) is that you must specifically use the data adapter to fill the dataset with data. The reason you must do this is because the dataset is disconnected from the data provider; it just holds a local copy of the data you're working with. To fill the dataset with data from the data adapter (and remember that our data adapter is already set up to get its data from the authors table of the pubs database), you use the data adapter's Fill method. Here's the code to add to the Form1_Load method; this code clears the dataset and then fills it with data from the data adapter:
Private Sub Form1_Load(ByVal sender As System.Object, _
    ByVal e As System.EventArgs) Handles MyBase.Load
    DataSet11.Clear()
    SqlDataAdapter1.Fill(DataSet11)
End Sub
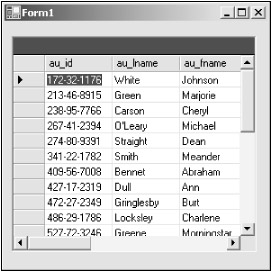
And that's it—now run the application. You can see the results in Figure 20.10, where you see the data in the pubs database's authors table displayed, showing the data for the various fields in that table, such as au_id (this is the name Microsoft has given to this field when it created this table—it's a contraction of "author ID"), au_lname (for "author last name"), and so on. (Note that not all the data can be displayed in the data grid at once, so scroll bars appear at right and at bottom of this control.)
In summary, here are the steps we've taken:
Create a data connection or use an existing data connection.
Drag a table from the Server Explorer onto a form; this adds a data connection and a data adapter to the form.
Generate a dataset.
Bind the dataset to controls.
Fill the dataset from a data adapter in code.
That gives us just about the easiest, most painless introduction to working with data access in Visual Basic .NET. Notice, however, that this was a special example, because here, we wanted to look at the entire authors table all at once. But what if we had wanted to look at only a few fields of the authors table? In that case, we'd have to configure the data adapter ourselves, and I'll show how that works with another example now. This new example is named DataAccess on the CD-ROM, and if you want to follow along, create a Windows Forms application of that name now.
| Tip |
In fact, it's worth noting that you can configure the data adapter in the EasyAccess example to select only a few fields in the authors table, or otherwise work on that table. Just right-click the adapter object and select the Configure Data Adapter menu item, which opens the same Data Adapter Configuration Wizard we're about to use to create the SQL to extract the data we want to work with from the database. See the next topic for more details. |
|
| ||
Free JavaScript Editor
JavaScript Editor