JavaScript Editor
JavaScript Debugger
JavaScript Editor
JavaScript Debugger|
| ||
Now that we're creating classes, we also can take a look at creating class libraries. When you've got a large number of classes to handle, you can store them in a class library and compile them into a DLL file, which can be used across multiple projects if you wish.
Here's an example, ClassLibraries on the CD-ROM. In this case, I'll create a class library with two classes, imaginatively called Class1 and Class2. These classes are just for demonstration purposes; both of them will have a method named Display which displays a message box. You pass the text for the message box to the Class1 Display method, and the text and a message box icon to the Class2 Display method, that's the only difference between these methods. To create a class library, select the New|Project item, and this time, select the Class Library icon in the New Project dialog, use the name ClassLibraries, and click OK.
This creates and opens the following template in a code designer:
Public Class Class1

End Class
We want to create two classes here, each with a Display method, so add this code:
Public Class Class1
    Public Sub Display(ByVal Message As String)
        MsgBox(Message)
    End Sub
End Class

Public Class Class2
    Public Sub Display(ByVal Message As String)
        MsgBox(Message, MsgBoxStyle.Exclamation)
    End Sub
End Class
To make this class library available to other projects, you compile it into a DLL (dynamic link library) file using the Build|Build ClassLibraries menu item which creates, in this case, ClassLibraries.dll.
To use this DLL file, I'll create a new project named Displayer now; to do that, use the New|Project menu item and click the "Add to Solution" radio button in the New Project dialog. Make this a Windows application named Displayer and click OK. Now make this new project the startup project with the Project|Set as Startup Project menu item (that is, you can't run a class library project like ClassLibraries, so you need a startup project to test out our code).
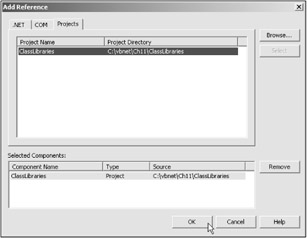
To use the classes in ClassLibraries.dll in the Displayer project, click the Project|Add Reference menu item to open the Add Reference dialog you see in Figure 11.4. Click the Projects tab, then double click the ClassLibraries item to make it appear in the Selected Components box, then click OK.
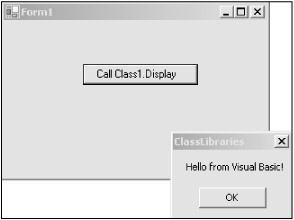
Now we can use the classes in the ClassLibraries class library; for example, to use Class1, you refer to it as ClassLibraries.Class1. Here's how I do that in the ClassLibraries example—I create an object of the ClassLibraries.Class1 class, then use that object's Display method like this:
    Dim cl As New ClassLibraries.Class1()

    Private Sub Button1_Click(ByVal sender As System.Object, _
        ByVal e As System.EventArgs) Handles Button1.Click
        cl.Display("Hello from Visual Basic!")
    End Sub
Now when you click this button, the Display method displays a message box as it should, as you see in Figure 11.5.
|
| ||
Free JavaScript Editor
JavaScript Editor