JavaScript Editor
JavaScript Debugger
JavaScript Editor
JavaScript Debugger|
| ||
In the previous example, we dragged an entire data table from the Server Explorer to a form, but often you'll want to look at only a few fields in a table, or otherwise customize what you want to do with a table before working with its data. To do that, you can create a data adapter yourself. It's easy to do.
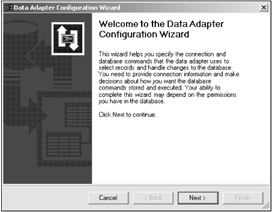
To see how this works, just click the Data tab in the toolbox now. In this case, I'll drag an OleDbDataAdapter object from the toolbox to the main form. (I'm going to use an OleDbDataAdapter here only because we already used an SqlDataAdapter in the previous example—the rest of the operations here are the same no matter what type of data adapter you use.) Doing so opens the Data Adapter Configuration Wizard that you see in Figure 20.11. This wizard will let you customize your data adapter as you want, which usually means creating the SQL statement this adapter will use. (You can always right-click a data adapter and select the Configure Data Adapter menu item to change an adapter's configuration, including its SQL.)
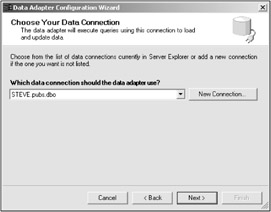
Click the Next button in the Data Adapter Configuration Wizard to choose the data connection you want to use, as you see in Figure 20.12. You can use an existing data connection of the type we've already created, or click the New Connection button to create a new data connection. (Clicking this button will open the Data Link Properties dialog that we've already used to create a new connection; you can see this dialog in Figure 20.5.) In this case, I'll use the connection we've already made to the pubs database, as you see in Figure 20.12.
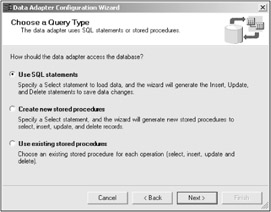
Click Next to choose a query type for the adapter, as you see in Figure 20.13. Here, I'll specify that we're going to create an SQL statement, as you see in the figure, but notice that you can either create new or use existing stored SQL procedures. (Using stored procedures is a common SQL technique, and they're great, because they not only hold the SQL you want to use, but they also are stored in the database and can be used over and over by many different applications.)
Click Next to display the dialog you see in Figure 20.14, where we'll generate the SQL statement we'll use in this data adapter.
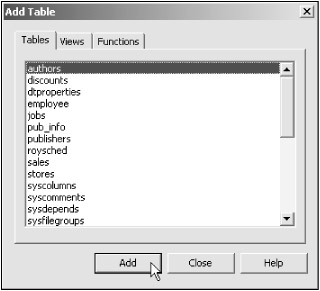
To make writing the SQL easy, click the Query Builder button now. This displays the Add Table dialog that you see in Figure 20.15. An SQL statement can work with several tables at the same time (as when you join them together), so here you select the tables you want to work with and click the Add button. When you've selected all the tables you want to work with in this way, click the Close button.
| Tip |
For more on working with multiple tables at once, see "Adding Multiple Tables to a Dataset" in this chapter. |
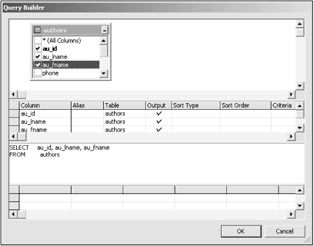
In this example, we're going to display a few fields from the authors table, so just select that table and click Add in the Add Table dialog, then click Close. This opens the Query Builder itself, as you see in Figure 20.16.
At top in Figure 20.16, you can see a window displaying fields in the authors table. If you were working with more than one table, you'd see them all open in windows in the query builder, and you'd also see lines indicating any relations connecting primary and foreign keys between the tables (see "Using Relational Databases" in this chapter for an example). You add a field to the generated SQL statement by clicking the checkboxes in a table's window. In Figure 20.16, I've checked the au_id, au_lname, and au_fname fields. (Again, note that these are the names Microsoft gave to these fields when the authors table was created— these names are not created by Visual Basic.) You also can select all fields in a table by checking the checkbox labeled with an asterisk (*), which specifies all fields in SQL. Note that you must select at least one field when creating the SQL for a data adapter, or the Query Builder won't be able to create working SQL.
Now click the OK button, creating the SQL statement you see in the Data Adapter Configuration Wizard in Figure 20.17. This is the SQL this adapter will use to retrieve data from the database, as well as update the database when you want to, delete records if you want to, and so on.
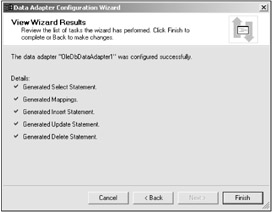
When you click Next in the Data Adapter Configuration Wizard, the wizard configures the data adapter and reports on the results, as you see in Figure 20.18. We're done—just click the Finish button to dismiss the Data Adapter Configuration Wizard.
| Tip |
For some SQL statements, like inner joins, the Data Adapter Configuration Wizard won't be able to create some SQL successfully, such as the SQL used to insert rows (which you can't do with an inner join). If this happens, click the Advanced Options button you see in Figure 20.14, and deselect the checkbox for the type of statements that are giving you trouble. In this case, that means deselecting the "Generate Insert, Update, and Delete statements" checkbox. Then click OK and Next to have the Data Adapter Configuration Wizard create the appropriate SQL. |
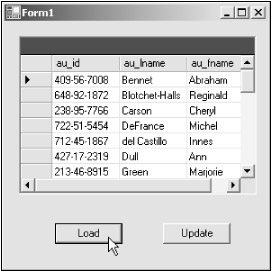
That creates the data adapter we'll need, OleDataAdapter1. Now create a new dataset using this data adapter, as we've done before (i.e., use the Data|Generate Dataset menu item), and connect the new dataset to a data grid using the DataSource and DataMember properties, also as before. Previously, I filled the data grid with data from the data adapter in the form's load event, but you'll often see "Load" buttons that the user can click to load data into the dataset (and so also the data grid), so I'll use a Load button here, with this code:
Private Sub btnLoad_Click(ByVal sender As System.Object, _
    ByVal e As System.EventArgs) Handles btnLoad.Click
    DataSet11.Clear()
    OleDbDataAdapter1.Fill(DataSet11)
End Sub
The user can edit the data in a data grid directly, and update the database with it if you want to allow such operations. To make that happen, I'll add a button with the caption "Update" and use the data adapter's Update method—like this—to update the database with the edited data in the data grid:
Private Sub btnUpdate_Click(ByVal sender As System.Object, _
    ByVal e As System.EventArgs) Handles btnUpdate.Click
    OleDbDataAdapter1.Update(DataSet11)
End Sub
When the user edits the data in the data grid control, that control automatically updates the dataset. To send the new data back to the database, you have to use the data adapter's Update method, as we're doing here. And that's it—you can see the results in Figure 20.19, where just the fields we selected are displayed. You can, of course, do a lot more with SQL than just select a few fields, but this example has shown us how to use SQL in data adapters to get the results we want.
Here's a summary of the steps we took in this example:
Create a data connection or use an existing data connection.
Drag an OleDBAdaptor or SQLAdaptor object onto a form; creates connection and adaptor objects.
Use the Data Adapter Configuration Wizard to configure the data adapter and create the SQL you want.
Generate a dataset.
Bind the dataset to controls.
Fill the dataset in code.
Now we've seen for ourselves the main objects you use in Visual Basic .NET data access, and we've put them to work, giving us some direct familiarity with the whole process. Armed with that firsthand knowledge, we're ready to take a look at the larger picture now, seeing what objects make up the Visual Basic data access world.
|
| ||
Free JavaScript Editor
JavaScript Editor