JavaScript Editor
JavaScript Debugger
JavaScript Editor
JavaScript Debugger|
| ||
Round trips to the server can take a lot of time, as everyone knows. (Right now, I'm on the fourth attempt to try to load the morning edition of my favorite newspaper into Internet Explorer and realizing that it just doesn't want to appear.) Validation controls were invented to help avoid losing some of that valuable time. They do their work in the client if the client browser can support JavaScript and some simple dynamic HTML (DHTML), checking the data that the user has entered before sending it to the server. (DHTML is used to make the error message visible without a server roundtrip—note that if the browser can't support the scripting and DHTML requirements, the validation is actually done on the server.) This is a common thing for Web pages to do, and you're probably familiar with warnings like "You must enter a valid phone number" and so on.
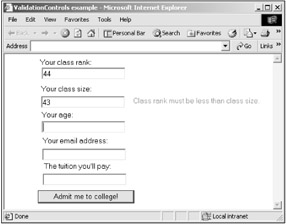
For an example, take a look at the ValidationControls example on the CD-ROM, which you can see in Figure 18.1. This example is all about applying to college, and asks for your class rank, class size, and so on. In this case, I've entered a class rank, number 44, but made the class size 43, and the Web page is smart enough to know that's not possible, and says so before the users can click the "Admit me to college!" button and waste both their time and ours with invalid data.
Client-side validation like this is done with validation controls, and there is one different type of validation control for each text box you see in Figure 18.1. You tie a validation control to a data-entry control like text boxes (or two data-entry controls in case you want to use a compare validation control to compare two entered values). The user enters data into the data-entry control and when that control loses the focus (as when the user clicks another control to give it the keyboard focus), or a button in the page is clicked, the validation control checks the entered data as you've set it up to do. If there is a problem—if the user omitted to enter some data in a required text box, for example—the validation control displays an error message, as you see in Figure 18.1. Validation controls are based on label controls; they are invisible by default until they determine that there's been an error, in which case they'll display their error message.
As soon as the user fixes the error and the data-entry control loses the focus or the user clicks a button, the validation control checks the new data, and, if the data is OK, makes its error message invisible again—no round trip to the server needed.
You can find the validation controls, and what they do, in Table 18.1. I'll go through them one by one in a page or two. We'll see them all in the Immediate Solutions section of this chapter.
|
Control |
Does this |
|---|---|
|
RequiredFieldValidator |
Makes sure the user enters data in the associated data-entry control. |
|
CompareValidator |
Uses comparison operators to compare user-entered data to a constant value or the value in another data-entry control. |
|
RangeValidator |
Makes sure that user-entered data is in a range between given lower and upper boundaries. |
|
RegularExpressionValidator |
Makes sure that user-entered data matches a regular-expression pattern. |
|
CustomValidator |
Makes sure user-entered data passes validation criteria that you set yourself. |
| Tip |
You can assign more than one validation control to the same data-entry control in case you want to check multiple conditions at the same time. |
Want to work with the validation controls in a Web page yourself in client-side script? You can loop through the page's Validators collection to work with each validation control in the page, checking their IsValid property to see if their validation test was successful. And you can use the whole page's IsValid property to see if all validation tests were successful. You also can force any validation control to check its data by using the control's Validate method.
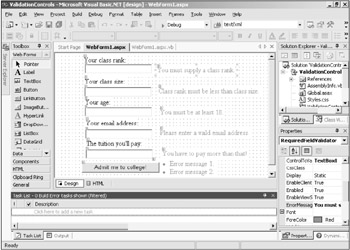
I'll take a look at the individual validation controls in detail now. To use these controls, you typically set the ErrorMessage property to the error message you want to display, and the ControlToValidate property to the control you want to check. You can see the various validators in the ValidationControls example at design time, as you see in Figure 18.2, showing their error messages.
|
| ||
Free JavaScript Editor
JavaScript Editor