JavaScript Editor
JavaScript Debugger
JavaScript Editor
JavaScript Debugger|
| ||
Well, you've got that company logo to display in a picture box, and it's 2,000×4,000 pixels, and the Big Boss refuses to let you make it smaller. That's too large for most screens, and picture boxes don't come with built-in scroll bars to let you scroll around the image. What can you do?
You can scroll the image yourself by adding scroll bars to the picture box manually; we'll do that in the ScrollImage example on the CD-ROM. This is a useful technique to know, but note that I'll have to use a few methods we haven't seen yet, such as using Graphics objects, which we'll see later in this book.
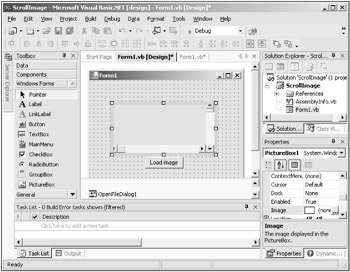
To set up this project, add a picture box to a form (the one in the Scroll Image example is 200×96 pixels), and then add both a horizontal and a vertical scroll bar, positioned so they're inside the picture box, as shown in Figure 8.8. The reason they're inside the picture box is that we'll make these scroll bars appear only if the displayed image is too large for the picture box, and if we make the scroll bars appear, we don't want them to inadvertently overlap other controls in the program.
Also, add a button with the text "Load image" as you see in Figure 8.8. When the user clicks this button, we'll load the image to display into the picture box. I'll let the user select which image to load (the image I'll use here, image.jpg, is included in the Scroll Image folder on the CD-ROM) by displaying a File Open dialog box using the OpenFileDialog control we'll see in the next chapter (see "Creating Open File Dialogs" in the next chapter for the details—we won't need to know much about File Open dialogs here). To make this work, add a new OpenFile Dialog control from the toolbox to our project, which makes that control appear in the component tray underneath the form, as shown in Figure 8.8.
When the user clicks the "Load image" button, I can use the OpenFileDialog1 control's ShowDialog method to show an Open File dialog. If the return value of that method is not DialogResult.Cancel (which means the user clicked the Cancel button), the name of the image file to open that the user selected will be in the OpenFileDialog1.FileName property, so I pass that filename to the Image.From File method that we saw in the previous chapter. This creates an Image object I can assign to the picture box's Image property, and so display the image:
    Private Sub Button1_Click(ByVal sender As System.Object, _
        ByVal e As System.EventArgs) Handles Button1.Click
        If OpenFileDialog1.ShowDialog() <> DialogResult.Cancel Then
            PictureBox1.Image = Image.FromFile(OpenFileDialog1.FileName)
            ⋮
        End If
    End Sub
Next, I'll set the maximum for the scroll bars to be the amount that the image is wider or higher than the picture box; note that I can find the image's dimensions with the PictureBox1.Image.Width and PictureBox1.Image.Height properties:
    Private Sub Button1_Click(ByVal sender As System.Object, _
        ByVal e As System.EventArgs) Handles Button1.Click
        If OpenFileDialog1.ShowDialog() <> DialogResult.Cancel Then
            PictureBox1.Image = Image.FromFile(OpenFileDialog1.FileName)
            HScrollBar1.Maximum = PictureBox1.Image.Width - _
                PictureBox1.Width
            VScrollBar1.Maximum = PictureBox1.Image.Height - _
                PictureBox1.Height
            ⋮
        End If
    End Sub
Finally, to determine if the scroll bars should actually be visible (i.e., if the image is larger than the picture box in one or both dimensions), I'll call a new Sub procedure, ShowScrollBars:
    Private Sub Button1_Click(ByVal sender As System.Object, _
        ByVal e As System.EventArgs) Handles Button1.Click
        If OpenFileDialog1.ShowDialog() <> DialogResult.Cancel Then
            PictureBox1.Image = Image.FromFile(OpenFileDialog1.FileName)
            HScrollBar1.Maximum = PictureBox1.Image.Width - _
                PictureBox1.Width
            VScrollBar1.Maximum = PictureBox1.Image.Height - _
                PictureBox1.Height
            ShowScrollBars()
        End If
    End Sub
In the ShowScrollBars Sub procedure, I'll check if either of the two scroll bars should be displayed by checking if the image doesn't fit in one or both dimensions of the picture box, like this:
    Private Sub ShowScrollBars()
        VScrollBar1.Visible = True
        HScrollBar1.Visible = True

        If PictureBox1.Height > PictureBox1.Image.Height Then
            VScrollBar1.Visible = False
        End If

        If PictureBox1.Width > PictureBox1.Image.Width Then
            HScrollBar1.Visible = False
        End If
    End Sub
Now the scroll bars will appear if they're needed. In this case, I'm going to give both scroll bars the same Scroll event handler, using the AddHandler function, to avoid duplicating code. The Scroll event handler will be named ScrollBars_Scroll, so I'll connect the Scroll event of both scroll bars to that handler when the form loads:
    Private Sub Form1_Load(ByVal sender As System.Object, _
        ByVal e As System.EventArgs) Handles MyBase.Load
        AddHandler HScrollBar1.Scroll, AddressOf ScrollBars_Scroll
        AddHandler VScrollBar1.Scroll, AddressOf ScrollBars_Scroll
    End Sub
Now, when either scroll bars is actually scrolled, the ScrollBars_Scroll event handler will be called, so I'll model it after a standard Scroll event handler:
    Public Sub ScrollBars_Scroll(ByVal sender As Object, _
        ByVal se As ScrollEventArgs)
        ⋮
    End Sub
This is where we'll scroll the image. That will actually happen with a Graphics object, where we draw a section of the image interactively, depending on the scroll bars' current values. We'll see more about Graphics objects later in this book; all we need to know now is that they let you work with the graphics drawing in a control, and that to use a Graphics object you should import the System.Drawing namespace. To get a Graphics object for the picture box, you can use the CreateGraphics method; in this case, I'll create a Graphics object named graphics:
    Public Sub ScrollBars_Scroll(ByVal sender As Object, _
        ByVal se As ScrollEventArgs)
        Dim graphics As Graphics = PictureBox1.CreateGraphics()
        ⋮
    End Sub
To actually draw the "scrolled" image, we'll just draw a section of the whole image, as dictated by the current scroll bar settings. You can do that with the DrawImage method, which has numerous overloaded forms. In this case, we can pass this method the image to work on (which is PictureBox1.Image), the target rectangle to draw in (which is the picture box's main area minus the areas taken up by the scroll bars), the source rectangle to get the image section from (which is the section the user has scrolled to in the image), and the units of measurement we're using (which is GraphicsUnit.Pixel here to indicate that we're working in pixel measurements). Here's what that looks like in the ScrollBars_Scroll event handler:
    Public Sub ScrollBars_Scroll(ByVal sender As Object, _
        ByVal se As ScrollEventArgs)
        Dim graphics As Graphics = PictureBox1.CreateGraphics()
        graphics.DrawImage(PictureBox1.Image, New Rectangle(0, 0, _
            PictureBox1.Width - HScrollBar1.Height, _
            PictureBox1.Height - VScrollBar1.Width), _
            New Rectangle(HScrollBar1.Value, VScrollBar1.Value, _
            PictureBox1.Width - HScrollBar1.Height, _
            PictureBox1.Height - VScrollBar1.Width), GraphicsUnit.Pixel)
    End Sub
This code draws the section of the image that the user has scrolled to in the picture box, which is what we need. Here's the whole code for this example:
Imports System.Drawing
Public Class Form1
    Inherits System.Windows.Forms.Form

    'Windows Form Designer generated code

    Private Sub ShowScrollBars()
        VScrollBar1.Visible = True
        HScrollBar1.Visible = True

        If PictureBox1.Height > PictureBox1.Image.Height Then
            VScrollBar1.Visible = False
        End If

        If PictureBox1.Width > PictureBox1.Image.Width Then
            HScrollBar1.Visible = False
        End If
    End Sub

    Public Sub ScrollBars_Scroll(ByVal sender As Object, _
        ByVal se As ScrollEventArgs)
        Dim graphics As Graphics = PictureBox1.CreateGraphics()
        graphics.DrawImage(PictureBox1.Image, New Rectangle(0, 0, _
            PictureBox1.Width - HScrollBar1.Height, _
            PictureBox1.Height - VScrollBar1.Width), _
            New Rectangle(HScrollBar1.Value, VScrollBar1.Value, _
            PictureBox1.Width - HScrollBar1.Height, _
            PictureBox1.Height - VScrollBar1.Width), GraphicsUnit.Pixel)
    End Sub

    Private Sub Form1_Load(ByVal sender As System.Object, _
        ByVal e As System.EventArgs) Handles MyBase.Load
        AddHandler HScrollBar1.Scroll, AddressOf ScrollBars_Scroll
        AddHandler VScrollBar1.Scroll, AddressOf ScrollBars_Scroll
    End Sub

    Private Sub Button1_Click(ByVal sender As System.Object, _
        ByVal e As System.EventArgs) Handles Button1.Click
        If OpenFileDialog1.ShowDialog() <> DialogResult.Cancel Then
            PictureBox1.Image = Image.FromFile(OpenFileDialog1.FileName)
            HScrollBar1.Maximum = PictureBox1.Image.Width - _
                PictureBox1.Width
            VScrollBar1.Maximum = PictureBox1.Image.Height - _
                PictureBox1.Height
            ShowScrollBars()
        End If
    End Sub
End Class
You can see the results of this example, ScrollImage, in Figure 8.9, where I've loaded the image that comes with this example, image.jpg, into the picture box and am scrolling it around using the scroll bars. Now you're scrolling picture boxes.
|
Related solution: |
Found on page: |
|---|---|
|
327 |
|
| ||
Free JavaScript Editor
JavaScript Editor