JavaScript Editor
JavaScript Debugger
JavaScript Editor
JavaScript Debugger|
| ||
Here's an example, named Painter on the CD-ROM, that shows how to use the Graphics class to draw 2D shapes. As you can see in Figure 13.1, this program lets you select various shapes to draw by clicking buttons in the toolbar. After you've selected a drawing tool, you can use the mouse to draw the figure—just press the mouse button at one corner of the figure, then drag it to the opposite corner and release the button, making the figure appear. I start this example by getting a Graphics object for the form using the form's CreateGraphics method (as this method is a member of the Control class, you can use it with all Windows forms and controls):
    Dim g As Graphics

    Private Sub Form1_Load(ByVal sender As System.Object, _
        ByVal e As System.EventArgs) Handles MyBase.Load
        g = Me.CreateGraphics()
    End Sub
| Tip |
Note that when you get a Graphics object for the entire form this way, that object corresponds to the whole form, not just the client area, so the drawing origin is the upper-left corner of the whole form, above the title bar. When a Graphics object is passed to you in the Paint event handler, that object's origin is at upper left of the client area (that is, the area below the title bar, menu bar, and toolbars, if any). |
Now I can draw using this graphics object as needed. I also define an enumeration named Tools that holds these values, corresponding to the buttons in the toolbar:
    Enum Tools
        Rectangle
        Ellipse
        Line
        Draw
    End Enum
When the user clicks a toolbar button, I can assign a variable named Tool a value from this enumeration to specify what drawing tool (line, rectangle, and so on) we're using currently:
    Dim Tool As Tools

    Private Sub ToolBar1_ButtonClick(ByVal sender As System.Object, _
        ByVal e As System.Windows.Forms.ToolBarButtonClickEventArgs) _
        Handles ToolBar1.ButtonClick
        If (ToolBar1.Buttons(0) Is e.Button) Then
            Tool = Tools.Rectangle
        End If
        If (ToolBar1.Buttons(1) Is e.Button) Then
            Tool = Tools.Ellipse
        End If
        If (ToolBar1.Buttons(2) Is e.Button) Then
            Tool = Tools.Line
        End If
        If (ToolBar1.Buttons(3) Is e.Button) Then
            Tool = Tools.Draw
        End If
    End Sub
I record the point at which the mouse button went down in a Point variable named down, like this:
    Dim up, down As Point
    Private Sub Form1_MouseDown(ByVal sender As Object, _
        ByVal e As System.Windows.Forms.MouseEventArgs) Handles _
        MyBase.MouseDown
        down = New Point(e.X, e.Y)
    End Sub
The user now moves the mouse to the opposite corner of the figure's defining rectangle and releases the mouse button. I can now create a rectangle of the Rectangle class after finding the figure's upper-left corner, width, and height. Then all I need to do is to check which kind of figure we're drawing (which I can do with the Tool variable), and draw the corresponding figure—here, I'm using a pre-defined blue-violet pen (see "Using the Pens and Brushes Classes" for the details on predefined pens), but note that you can create pens of any color (see "Specifying Drawing Colors" for the details):
    Dim up, down As Point
    Dim r As Rectangle

    Private Sub Form1_MouseUp(ByVal sender As Object, _
        ByVal e As System.Windows.Forms.MouseEventArgs) _
        Handles MyBase.MouseUp
        up = New Point(e.X, e.Y)
        r = New Rectangle(Math.Min(up.X, down.X), _
            Math.Min(up.Y, down.Y), Math.Abs(up.X - down.X), _
            Math.Abs(up.Y - down.Y))

        Select Case Tool
            Case Tools.Rectangle
                g.DrawRectangle(Pens.BlueViolet, r)
            Case Tools.Ellipse
                g.DrawEllipse(Pens.BlueViolet, r)
            Case Tools.Line
                g.DrawLine(Pens.BlueViolet, up, down)
        End Select
    End Sub
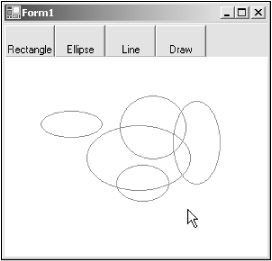
You can see the results in Figure 13.5, where I'm drawing ellipses.
Note that there's also a button labeled "Draw" in Figure 13.1—this button lets you draw freehand with the mouse. To implement that, I'll add code to the MouseMove event handler and use the Graphics class's DrawLines method. You pass this method an array of the points to connect with lines, so all we need to do is to store the points passed to us in MouseMove. (A MouseMove event is not generated for every pixel the mouse passes over, but rather only so many times a second, so all we need to do is to connect the dots with short lines using DrawLines.) I'll do that with an array named Points—note that since DrawLines gets the number of lines to draw from the length of the array passed to it, I'll need to redimension this array every time we add a new point to it. Here's how the code looks to draw freehand with the mouse; note that I don't invoke the DrawLines method unless there are at least two points stored in the Points array, which is the minimum that DrawLines requires:
    Dim Points() As Point
    Dim NumberPoints As Integer = 0

    Private Sub Form1_MouseMove(ByVal sender As Object, _
        ByVal e As System.Windows.Forms.MouseEventArgs) Handles _
        MyBase.MouseMove
        If Tool = Tools.Draw And e.Button = MouseButtons.Left Then
            Dim p As New Point(e.X, e.Y)

            ReDim Preserve Points(NumberPoints)

            Points(NumberPoints) = p
            NumberPoints += 1

            If NumberPoints >= 2 Then
                g.DrawLines(Pens.BlueViolet, Points)
            End If
        End If
    End Sub
End Class
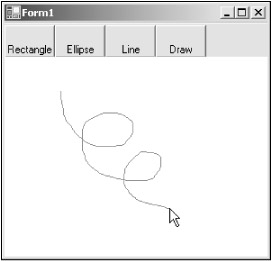
You can see the results in Figure 13.6, where I'm drawing (well, more or less) with the mouse.
But here's a problem—if you minimize and then restore, or cover and then uncover, Painter, you'll notice that all the graphics disappear. They didn't previously; in VB6, you could use the AutoRedraw property to make the window redraw itself, but now you're responsible for that. See the next topic.
|
| ||
Free JavaScript Editor
JavaScript Editor