JavaScript Editor
JavaScript Debugger
JavaScript Editor
JavaScript Debugger|
| ||
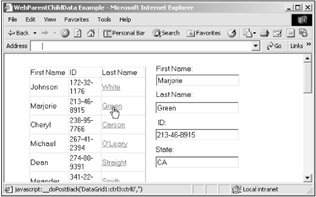
We've seen how to create master/detail Windows forms (see "Using Master/Detail Relationships and Data Relation Objects" in Chapter 21, for example); you also can create master/detail Web forms. To see how this works, take a look at the WebParentChildData example on the CD-ROM. You can see this example at work in Figure 23.13, where it's displaying data from the authors table of the pubs database.
Note in particular that the Last Name column in the data grid in Figure 23.13 holds hyperlinks. When the user clicks one of those hyperlinks, the corresponding author's data is displayed in the text boxes next to the data grid, as you see in the figure.
This example uses a data view, and uses the RowFilter property of the data view to select a single record to display in the bound text boxes. (The text boxes in this example are bound to that data view, as in the WebDataNavigation example in the In Depth section of this chapter.) The question here is—how do we let the user click a record in the data grid and set the data view's RowFilter property?
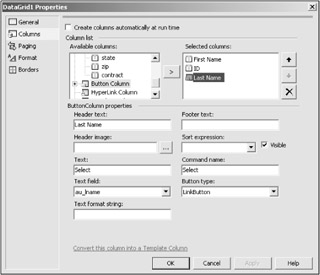
We can do that by using a button column in the data grid (see the In Depth section of this chapter for more on what kinds of columns you can use in a data grid). The button column in Figure 23.13 is the Last Name column that displays hyperlinks; to create this button column, right-click the data grid and select the Property Builder item, opening the dialog you see in Figure 23.14.
Click the Columns tab in this dialog box, and deselect the "Create columns automatically at run time" check box, which lets us specify what columns the data grid should display. Next, add the au_fname column, giving it the header text "First Name", and the au_id column, giving it the header text "ID". This creates the two standard columns you see in Figure 23.13. Now select the Button Column item in the Available Columns box, and add it to the columns of the data grid. Give this new button column the header text "Last Name", and select au_lname in the Text field drop-down box, as you see in Figure 23.14.
This creates the column of hyperlinks you see in Figure 23.13. When the user clicks one of these hyperlinks, a SelectedIndexChanged event occurs, and we can display the clicked record's fields in the bound text boxes by selecting that record in the data view's RowFilter property. Here's the code to do that:
Private Sub DataGrid1_SelectedIndexChanged(ByVal sender As System.Object, _
    ByVal e As System.EventArgs) Handles DataGrid1.SelectedIndexChanged
    DataView1.RowFilter = "au_id = '" & _
        DataGrid1.SelectedItem.Cells(1).Text & "'"
    TextBox1.DataBind()
    TextBox2.DataBind()
    TextBox3.DataBind()
    TextBox4.DataBind()
End Sub
And, of course, we have to load the dataset and bind it when the page loads:
Private Sub Page_Load(ByVal sender As System.Object, _
    ByVal e As System.EventArgs) Handles MyBase.Load
    DataSet11.Clear()
    OleDbDataAdapter1.Fill(DataSet11)
    DataGrid1.DataBind()
    TextBox1.DataBind()
    TextBox2.DataBind()
    TextBox3.DataBind()
    TextBox4.DataBind()
End Sub
And that's it—you can see the result in Figure 23.13. When the user clicks a hyperlink in the data grid's button column, the corresponding record's details are displayed in the text boxes.
|
Related solutions: |
Found on page: |
|---|---|
|
878 |
|
|
919 |
|
|
971 |
|
| ||
Free JavaScript Editor
JavaScript Editor