JavaScript Editor
JavaScript Debugger
JavaScript Editor
JavaScript Debugger|
| ||
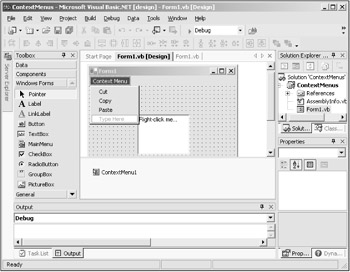
Creating context menus is much like creating standard menus—you only need to add a ContextMenu control to a Windows form, as you see in Figure 9.18. The caption for this context menu is simply "Context Menu", but everything else is the same as creating any standard menu (see "Creating Menus" in this chapter)—just give the items in the menu the captions you want, as you also see in Figure 9.18.
Now you can connect code to the context menu items as you can with any click events:
   Private Sub MenuItem3_Click(ByVal sender As System.Object, _
       ByVal e As System.EventArgs) Handles MenuItem3.Click
       MsgBox("You clicked the Paste item")
   End Sub

   Private Sub MenuItem2_Click(ByVal sender As System.Object, _
       ByVal e As System.EventArgs) Handles MenuItem2.Click
       MsgBox("You clicked the Copy item")
   End Sub

   Private Sub MenuItem1_Click(ByVal sender As System.Object, _
       ByVal e As System.EventArgs) Handles MenuItem1.Click
       MsgBox("You clicked the Cut item")
   End Sub
Finally, assign the context menu control, such as ContextMenu1, to the ContextMenu property of the control you want to connect it to. In the ContextMenus example on the CD-ROM, I've connected this context menu to a multiline text box; when the user right-clicks this text box, the context menu appears, as you see in Figure 9.2, and you can select the items in that menu.
| Tip |
You also can make context menus appear whenever you want to—just set their Visible property to True. |
|
| ||
Free JavaScript Editor
JavaScript Editor