JavaScript Editor
JavaScript Debugger
JavaScript Editor
JavaScript Debugger|
| ||
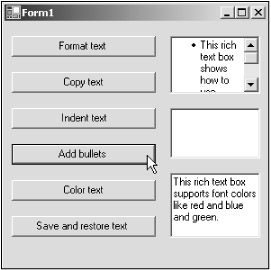
Rich text boxes support bullets—those black dots that appear in lists of items that you want to set off in text. Putting a bullet in front of each item gives the list a snappy appearance and can be very effective visually.
To set bullets, you use the SelectionBullet and BulletIndent properties. The SelectionBullet property displays a bullet in front of the paragraph in which the current selection is, and the BulletIndent property indicates how much you want the bullet to be indented from the left. Here's an example from the RichTextBoxes example on the CD-ROM:
Private Sub Button4_Click(ByVal sender As System.Object, ByVal e As_
    System.EventArgs) Handles Button4.Click
    RichTextBox1.Text = "This rich text box shows how to use bullets " + _
        "and indent bulleted text."
    RichTextBox1.SelectionIndent = 20
    RichTextBox1.BulletIndent = 10
    RichTextBox1.SelectionBullet = True
End Sub
That's it—the result appears in Figure 5.10.
| Tip |
It's a good idea to set the bullet indentation, because if you don't, the bullet will appear right in front of the first character in the paragraph you're bulleting, which can look odd. |
|
| ||
Free JavaScript Editor
JavaScript Editor