JavaScript Editor
JavaScript Debugger
JavaScript Editor
JavaScript Debugger|
| ||
As mentioned earlier, threading lets your program seem as though it's executing several tasks at once. What's actually happening is that time is divided by the computer into slices, and when you start a new thread, that thread gets some time slices, which means that thread's code can execute. (The program itself is also running a thread, called the main thread, to execute its own code.)
| Tip |
Although you can use threads with user interface elements such as forms and controls in Visual Basic, that's risky. (Microsoft recommends you only execute methods of a form or control only in the thread in which the form or control was created, and that you don't use the SyncLock statement—see "Using SyncLock to Synchronize Threads" in this chapter—to lock threads that work with controls or forms.) Visual Basic threads are primarily designed to be used with code that executes but doesn't directly access user interface elements, and that's the way we'll use them in this chapter. |
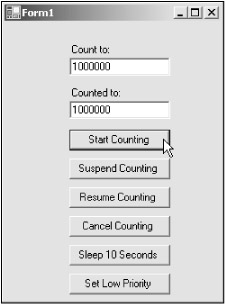
To see threads in practice, take a look at the Threading example on the CD-ROM, which you see in Figure 24.10. This example demonstrates a lot of thread techniques; it creates a new thread and uses that thread to count to 1,000,000.
After starting a new thread, you typically use events to let the thread communicate with the rest of your program. To follow along, create a new Windows application named Threading now, and add a new class to the application named counter, using the Project|Add Class menu item. This class will count from 1 to a value specified in a public data member named CountTo when you call the Count method. After the count has reached the value in CountTo, a FinishedCounting event will occur. Here's the code for the counter class; note the use of RaiseEvent to make the FinishedCounting event occur, and that I'm passing the total value we've counted to the FinishedCounting event handler:
Public Class counter
    Public CountTo As Integer
    Public Event FinishedCounting(ByVal NumberOfMatches As Integer)

    Sub Count()
        Dim LoopIndex, Total As Integer
        Total = 0

        For LoopIndex = 1 To CountTo
            Total += 1
        Next LoopIndex

        RaiseEvent FinishedCounting(Total)
    End Sub
End Class
How do we make use of this class with a new thread? In the main form of this example, I'll create both an object of this class, counter1, and a new thread, Thread1. The code for a new thread must be in a Sub procedure which takes no arguments. In this case, I'll call the counter1 object's Count method, which will perform the counting operation:
Public Class Form1
    Inherits System.Windows.Forms.Form
    Dim counter1 As New counter()
    Dim Thread1 As New System.Threading.Thread(AddressOf counter1.Count)
        ⋮
When the user clicks the "Start Counting" button in this example, the code will read the value it's supposed to count to from the top text box you see in Figure 24.10, TextBox1, and assign that value to counter1.CountTo. We'll also clear the text in the result text box, TextBox2, and connect an event handler to the FinishedCounting event using the AddHandler method (for more on AddHandler, see "Creating a LinkLabel in Code" in Chapter 5). Then we'll start the new thread with its Start method:
Public Class Form1
    Inherits System.Windows.Forms.Form
    Dim counter1 As New counter()
    Dim Thread1 As New System.Threading.Thread(AddressOf counter1.Count)

' Windows Form Designer generated code...

    Private Sub Button1_Click(ByVal sender As System.Object, _
        ByVal e As System.EventArgs) Handles Button1.Click
        TextBox2.Text = ""
        counter1.CountTo = TextBox1.Text
        AddHandler counter1.FinishedCounting, AddressOf _
            FinishedCountingEventHandler
        Thread1.Start()
    End Sub
        ⋮
This starts the new thread, and when it's done counting, it'll cause a FinishedCounting event. We can handle that event in the FinishedCountingEventHandler Sub procedure, displaying the total count in the second text box in the example:
Public Class Form1
    Inherits System.Windows.Forms.Form
    Dim counter1 As New counter()
    Dim Thread1 As New System.Threading.Thread(AddressOf counter1.Count)

' Windows Form Designer generated code...

    Private Sub Button1_Click(ByVal sender As System.Object, _
        ByVal e As System.EventArgs) Handles Button1.Click
        TextBox2.Text = ""
        counter1.CountTo = TextBox1.Text
        AddHandler counter1.FinishedCounting, AddressOf _
            FinishedCountingEventHandler
        Thread1.Start()
    End Sub

    Sub FinishedCountingEventHandler(ByVal Count As Integer)
        TextBox2.Text = Count
    End Sub
        ⋮
You can see the results in Figure 24.10; when you click the "Start Counting" button, the code uses the new thread to perform its counting operation and displays the total count in the second text box.
You also can suspend a thread, which stops it temporarily until you resume its operation. You can suspend the new thread in the Threading example by clicking the "Suspend Counting" button, which uses this code:
    Private Sub Button5_Click(ByVal sender As System.Object, _
        ByVal e As System.EventArgs) Handles Button5.Click
        Thread1.Suspend()
    End Sub
You also can resume thread operation by clicking the "Resume Counting" button in the Threading example, which uses this code:
    Private Sub Button6_Click(ByVal sender As System.Object, _
        ByVal e As System.EventArgs) Handles Button6.Click
        Thread1.Resume()
    End Sub
And you can stop a thread altogether with its Abort method. Here's how that works when you click the "Cancel Counting" button in the Threading example on the CD-ROM:
    Private Sub Button2_Click(ByVal sender As System.Object, _
        ByVal e As System.EventArgs) Handles Button2.Click
        Thread1.Abort()
    End Sub
You also can make a thread go to "sleep" when you want it to, suspending execution for a specified amount of time. You do this by passing the number of milliseconds (1/1000ths of a second) you want the thread to sleep to the thread's sleep method. Here's how that works in the Threading example on the CD-ROM when you click the "Sleep 10 Seconds" button:
    Private Sub Button3_Click(ByVal sender As System.Object, _
        ByVal e As System.EventArgs) Handles Button3.Click
        Thread1.Sleep(10 * 1000)
    End Sub
| Tip |
Although the time you pass to Sleep is in milliseconds, in practice, the precision with which a Windows machine can measure time intervals is limited. In my tests, the smallest sleep interval I can get is a hundredth of a second, which means that calling Sleep(1) gives the same result as calling Sleep(10). |
Threads are scheduled for execution based on their priority. You can get and set the priority of a thread by accessing its Priority property and setting it to a value from the ThreadPriority enumeration. Here are the possible values:
AboveNormal— Gives a thread higher priority.
BelowNormal— Gives a thread lower priority.
Highest— Gives a thread highest priority.
Lowest— Gives a thread lowest priority.
Normal— Gives a thread average priority.
Here's what that looks like in the Threading example, where I set the thread's priority to BelowNormal:
    Private Sub Button4_Click(ByVal sender As System.Object, _
        ByVal e As System.EventArgs) Handles Button4.Click
        Thread1.Priority = System.Threading.ThreadPriority.BelowNormal
    End Sub
The ThreadState property gives you information about the status of a thread. Because threads can be in more than one state at any given time, the value stored in ThreadState can be a combination of the values in the System.Threading.Threadstate enumeration. Here are the values in that enumeration:
Initialized— The thread was initialized, but it hasn't started.
Ready— The thread is ready.
Running— The thread is running.
Standby— The thread is on standby.
Terminated— The thread has terminated.
Transition— The thread is in transition between two states.
Unknown— The thread state is unknown.
Wait— The thread is waiting.
Threads operate largely by themselves, which is why you have to give a little thought to how to coordinate them. For example, two threads may be working with the same data, and you might not want the second thread to work with that data until the first thread is finished with it.
One common practice is to synchronize threads using events. We've seen how to use events with threads already. You can use an event to signal a thread that another thread is finished working with some critical data, for example.
There are two additional ways to synchronize thread execution in Visual Basic—the SyncLock statement, and the Join method. We'll see both of them at work in the SynchronizeThreads example on the CD-ROM. This example uses two threads to increment a single value, and because both threads operate on a single data item, we'll get a chance to synchronize those threads here. This example uses a class named counter as the Threading example did, but this counter class is much simpler, containing a single data member named Total:
Now, in the example's main form, I'll create an object of this class, c, and two threads, Thread1 and Thread2:
Public Class Form1
    Inherits System.Windows.Forms.Form
    Dim c As New counter()
    Dim Thread1 As New System.Threading.Thread(AddressOf Counter1)
    Dim Thread2 As New System.Threading.Thread(AddressOf Counter2)
        ⋮
When the user clicks a button, both these threads will be started; the code for Thread1 is in a Sub procedure named Counter1, and the code for Thread2 is in a Sub procedure named Counter2. And here's the important point, the code for both threads will increment the same value, c.Total:
Public Class Form1
    Inherits System.Windows.Forms.Form
    Dim c As New counter()
    Dim Thread1 As New System.Threading.Thread(AddressOf Counter1)
    Dim Thread2 As New System.Threading.Thread(AddressOf Counter2)

' Windows Form Designer generated code...

    Private Sub Button1_Click(ByVal sender As System.Object, _
        ByVal e As System.EventArgs) Handles Button1.Click
        Thread1.Start()
        Thread2.Start()
    End Sub

    Private Sub Counter1()
        Dim LoopIndex As Integer

        For LoopIndex = 1 To 100
            Dim temp = c.Total
            Thread1.Sleep(1)
            c.Total = temp + 1
        Next LoopIndex
    End Sub

    Private Sub Counter2()
        Dim LoopIndex As Integer

        For LoopIndex = 1 To 100
            Dim temp = c.Total
            Thread2.Sleep(1)
            c.Total = temp + 1
        Next LoopIndex
    End Sub
End Class
The code for each thread executes a loop 100 times, reading the value in c.Total, sleeping for a millisecond, then incrementing the value in c.Total. Because there are two threads, each incrementing this value 100 times, we should end up with a value of 200.
However, there's a problem here. When Thread1 has copied the value in c.Total to a variable named temp and is sleeping, the other thread, Thread2, increments the actual value in c.Total. Then, when Thread1 wakes up, it'll increment the value it has already stored a millisecond ago, temp (instead of using the new value in c.Total, which was just incremented by the other thread), and overwrite c.Total with its own, out-of-date value. In this way, it cancels out the new value stored in c.Total by the other thread, and the two threads will interfere with each other. If you run this code as it stands, the total count it will display will be 100, not 200 as it should be.
To fix the problem, we have to restrict access to c.Total by one thread when the other thread is using that value. We can do that with the SyncLock statement. To use that statement, you pass it an expression to use to lock access, such as an object. (The type of this expression must be a reference type, such as a class, a module, an array, or an interface.) For example, if you pass it an object, SyncLock will lock access to that object, giving access only the current thread and denying access to that object by any other thread. When an End SyncLock statement is reached, the lock is removed, and other threads get access to the object again. This means that we can fix the problem in this example by locking access to the c object when a thread is working with it like this:
Public Class Form1
    Inherits System.Windows.Forms.Form
    Dim c As New counter()
    Dim Thread1 As New System.Threading.Thread(AddressOf Counter1)
    Friend WithEvents Label1 As System.Windows.Forms.Label
    Dim Thread2 As New System.Threading.Thread(AddressOf Counter2)

' Windows Form Designer generated code...

    Private Sub Button1_Click(ByVal sender As System.Object, _
        ByVal e As System.EventArgs) Handles Button1.Click
        Thread1.Start()
        Thread2.Start()
    End Sub

    Private Sub Counter1()
        Dim LoopIndex As Integer

        For LoopIndex = 1 To 100
            SyncLock c
                Dim temp = c.Total
                Thread1.Sleep(1)
                c.Total = temp + 1
            End SyncLock
        Next LoopIndex
    End Sub

    Private Sub Counter2()
        Dim LoopIndex As Integer

        For LoopIndex = 1 To 100
            SyncLock c
                Dim temp = c.Total
                Thread2.Sleep(1)
                c.Total = temp + 1
            End SyncLock
        Next LoopIndex
    End Sub
End Class
This synchronizes the two threads—now only one at a time has access to c.Total. However, we're not done yet—we still have to display the total count in a text box when the two threads are done. In the Threading example, we used an event—the FinishedCounting event—to determine when a thread had done its work, but there's another way to find out when a thread has finished; you can use the Join method. When you call this method, it'll return only when the thread has finished. After the two threads have finished, which we can determine using the Join method after we've started the threads when the user clicks a button, we can display the total count in a text box like this:
    Private Sub Button1_Click(ByVal sender As System.Object, _
        ByVal e As System.EventArgs) Handles Button1.Click
        Thread1.Start()
        Thread2.Start()
        Thread1.Join()
        Thread2.Join()
        TextBox1.Text = c.Total
    End Sub
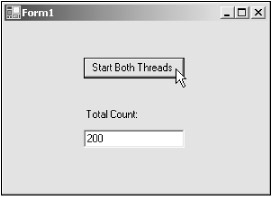
And that's it. When you run this example, the total count ends up as 200, as you see in Figure 24.11. The two threads in this example are now synchronized, even though they work with the same data item.
There are other forms of the Join method; see "Joining Threads" in this chapter for more details. Now it's time to turn to the Immediate Solutions section to get to all the details on the topics we've been discussing in this chapter—user controls, Web user controls, and multithreading.
|
| ||
Free JavaScript Editor
JavaScript Editor