JavaScript Editor
JavaScript Debugger
JavaScript Editor
JavaScript Debugger|
| ||
The graphics handling in Visual Basic.NET is based on GDI+ (GDI stands for Graphics Device Interface). A graphics device interface such as GDI+ allows you to display graphics on a screen-or a printer-without having to handle the details of a specific display device. You make calls to methods supported by the GDI+ classes and those methods make the corresponding calls to individual device drivers as needed to handle the screen or printer.
GCI+ support covers these categories:
Vector graphics are all about drawing "primitive" shapes such as lines, curves, and other similar figures. As you might recall from physics classes, vectors are line segments that have both a length and a direction, and in graphics, you can build more complicated figures, such as rectangles, using these line segments. Everything in 2D graphics is drawn with vectors (which is to say, with line segments) that can be assembled into squares and rectangles and even curves and circles. For example, to draw a rectangle, you need only supply the upper-left corner of the rectangle in X and Y coordinates, and the height and width of the rectangle.
In Visual Basic 2D graphics, the drawing origin (0, 0) is at the upper left of the drawing surface; the positive X axis extends to the right and the positive Y axis downward, much like the way you'd read text on a page (and don't forget that all measurements are in pixels). Using that coordinate system, you can indicate to the vector graphics classes how you want your lines, ellipses, rectangles, and other figures to appear.
GDI+ also supports a Pen class that specifies just how you draw figures. In particular, you can customize pens, specifying line color, line width, and line style. When you draw a figure-such as an ellipse-you must create and provide a Pen object that GDI+ will use to draw that ellipse.
| Tip |
Actually, you don't have to create a Pen object from scratch when you want to draw anything-you can use one of the predefined pens in the Pens class. See "Using the Pens and Brushes Classes" later in this chapter. |
Similarly, GDI+ supports a Brush class that you can use to fill the figures you've drawn in, as when you want to fill a rectangle or polygon with color. The Brush class is actually an abstract class; instead of using it directly, you use one of the classes derived from it:
HatchBrush
LinearGradientBrush
PathGradientBrush
SolidBrush
TextureBrush
| Tip |
As with the Pens class, there are a number of predefined solid color brushes in the Brushes class. See "Using the Pens and Brushes Classes" later in this chapter. |
However, vector graphics-even the complex Bézier curves that you can now create-are based fundamentally on connecting points with lines, and they're not useful for images. For that, you use the Bitmap class.
Imagine trying to draw the kind of pictures you see in digital photographs or even icons with vector graphics-you could do it, but assembling such images from lines and curves would be just about impossible. Instead, you store those kinds of images as bitmaps, which are simple arrays of points (although they may be compressed when stored on disk) corresponding to pixels on the screen. In other words, bitmaps store the actual pixel settings needed to display the corresponding image.
Handling and working with such bitmaps is actually more complex than simply working with vector graphics, so GDI+ supports the Bitmap class, with all kinds of built-in methods to display and handle images.
Typography is all about displaying text. GDI+ has a lot of support for typography, allowing you to display text using various different fonts, in various sizes, and in various styles (such as italic and bold), as well as in different colors. The typography supported by GDI+ also supports a technique now called antialiasing, which makes text appear smoother on the screen, avoiding the jagged edges of text that used to be typical in the early days of personal computing.
We'll be working with GDI+ through the Visual Basic Graphics class. Working directly with GDI+ is pretty abstract, and the Graphics class gives us a drawing surface that we can work with instead. The actual methods we'll be using here, such as DrawRectangle, DrawImage, and FillEllipse, are all methods of the Graphics class.
As in Java, the Graphics class is a large class, with many methods available to use. In fact, we've already seen this class at work back in Chapter 8, where we scrolled images (see "Scrolling Images" in that chapter's Immediate Solutions section). Now that we're working with the Graphics class explicitly, I'll take another look at that example in this chapter. And we'll see how to draw and fill figures in here.
Drawing 2D figures involves two steps-getting a Graphics object for the object you want to draw in (such as a form or picture box), and using the methods of that Graphics object to draw the figures you want. You can get a Graphics object in two ways-by using one that was passed to you or by creating one from scratch. For example, if you want to draw in a form, you'll get a graphics object in a handler procedure for the form's Paint event. This event occurs when the form needs to be drawn (or redrawn) for any reason. However, you might want more control than that, and might not want to wait until the form needs to be drawn or redrawn before displaying your graphics, in which case you can create a Graphics object with the form's CreateGraphics method. (This is a method of the Control class, so it works with all Windows forms and Windows controls.) Here's how that might look in code:
    Dim g As Graphics

    Private Sub Form1_Load(ByVal sender As System.Object, _
        ByVal e As System.EventArgs) Handles MyBase.Load
        g = Me.CreateGraphics()
    End Sub
| Tip |
It's important to realize that you can't draw graphics in a form from its Load event, because the form's drawing surface hasn't been created yet. You must use the Paint event instead of the Load event. |
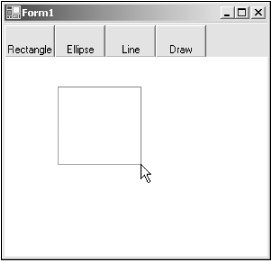
For example, we're going to create an example named Painter in this chapter that lets you select what graphics figure to draw and then lets you draw that figure with the mouse. You can see the Painter example in Figure 13.1.
Here's how Painter works in overview (we'll see it in more detail in the Immediate Solutions section of this chapter-see "Drawing Figures with Pens")-when you press the mouse button, Painter stores the location of the mouse:
    Private Sub Form1_MouseDown(ByVal sender As Object, _
        ByVal e As System.Windows.Forms.MouseEventArgs) Handles _
        MyBase.MouseDown
        down = New Point(e.X, e.Y)
    End Sub
Then you move the mouse to a new location, and when you release the mouse button, Painter will draw the figure you've chosen (lines, rectangles, ellipses, and so on). To do that, it stores the location at which the mouse button went up, then creates a rectangle enclosing the figure with the Rectangle class (note the use of Math.Min and Math.Abs to find the upper-left corner, width, and height of the rectangle):
    Private Sub Form1_MouseUp(ByVal sender As Object, _
        ByVal e As System.Windows.Forms.MouseEventArgs) _
        Handles MyBase.MouseUp
        up = New Point(e.X, e.Y)
        r = New Rectangle(Math.Min(up.X, down.X), _
            Math.Min(up.Y, down.Y), Math.Abs(up.X - down.X), _
            Math.Abs(up.Y - down.Y))
        ⋮
Now all we have to do is to pass that rectangle (or, if we're drawing lines, the beginning and ending points of the line) to the DrawRectangle, DrawEllipse, or DrawLine method. How do we determine what kind of figure to draw? When you click a button in the toolbar you see in Figure 13.1 to select a particular drawing tool (such as the line drawing tool, the rectangle drawing tool, and so on), the Painter program assigns a variable named Tool a value from the Tools enumeration that we'll create. Then, we need only check the value in Tool and draw the corresponding figure-note here that I'm using the predefined BlueViolet pen from the Pens class to draw with:
    Private Sub Form1_MouseUp(ByVal sender As Object, _
        ByVal e As System.Windows.Forms.MouseEventArgs) _
            Handles MyBase.MouseUp
        up = New Point(e.X, e.Y)
        r = New Rectangle(Math.Min(up.X, down.X), Math.Min(up.Y, down.Y), _
            Math.Abs(up.X - down.X), Math.Abs(up.Y - down.Y))

        Select Case Tool
            Case Tools.Rectangle
                g.DrawRectangle(Pens.BlueViolet, r)
            Case Tools.Ellipse
                g.DrawEllipse(Pens.BlueViolet, r)
            Case Tools.Line
                g.DrawLine(Pens.BlueViolet, up, down)
        End Select
    End Sub
You can see the result in Figure 13.1, where I'm drawing a rectangle-now we're drawing in Windows forms.
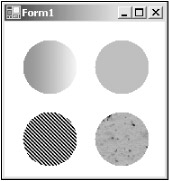
In this chapter, you also will see how to fill in figures with brushes. To fill in a figure with a brush, you use methods like FillEllipse, FillRectangle, and so on. You can see this at work in the FillGraphics example on the CD-ROM, where I'm filling in four circles using various brushes, as you see in Figure 13.2.
There are various brush classes you can use, all derived from the Brush class. The FillGraphics example uses the LinearGradientBrush, HatchBrush, SolidBrush, and TextureBrush classes. To use these classes, you import the System.Drawing.Drawing2D namespace. Here's what this example looks like in code-note that the texture brush uses an image to fill a figure. In this case, I'm using the greenstone.bmp image that comes with Windows 2000:
Imports System.Drawing.Drawing2D
Public Class Form1
    Inherits System.Windows.Forms.Form

    'Windows Form Designer generated code

    Private Sub Form1_Paint(ByVal sender As Object, _
        ByVal e As System.Windows.Forms.PaintEventArgs) _
        Handles MyBase.Paint
        Dim g As Graphics
        Dim r As Rectangle
        g = Me.CreateGraphics()

        r = New Rectangle(20, 20, 60, 60)
        Dim lb As New LinearGradientBrush(_
           r, Color.Red, Color.Yellow, LinearGradientMode.Horizontal)
        g.FillEllipse(lb, r)

        r = New Rectangle(20, 100, 60, 60)
        Dim hb As New HatchBrush(HatchStyle.DarkDownwardDiagonal, _
            Color.LightBlue)
        g.FillEllipse(hb, r)

        r = New Rectangle(100, 20, 60, 60)
        Dim sb As New SolidBrush(Color.Coral)
        g.FillEllipse(sb, r)

        r = New Rectangle(100, 100, 60, 60)
        Dim tb As New TextureBrush(Bitmap.FromFile("greenstone.bmp"))
        g.FillEllipse(tb, r)
    End Sub
End Class
You can see the results in Figure 13.2. Using brushes like these, especially texture brushes and linear gradient brushes, can give your program a professional appearance.
|
| ||
Free JavaScript Editor
JavaScript Editor