JavaScript Editor
JavaScript Debugger
JavaScript Editor
JavaScript Debugger|
| ||
Windows services are much like other Windows applications, but there are a few differences. First, they usually don't have a user interface except for, perhaps, a control panel that can be opened by double-clicking a notify icon. Second, their life cycle is different from standard programs because they typically start automatically when you boot your computer and quit only when you shut down. Third, they usually provide support services rather than acting as a front-line application. Device drivers, such as those that control printers, displays, volume controls, and so on, often let the user configure how they work with Windows services that use notify icons to display control panels. However, Windows services don't need to have control panels, and, in fact, the example we'll see in this chapter won't.
In Visual Basic .NET, Windows services are based on the ServiceBase class; that class provides most of the support we'll need. To create a working Windows service, you should override the OnStart and OnStop event handlers, which are called when the service starts and stops, respectively. You can configure a service to start automatically when the computer boots, or start manually using a tool built into Windows: the Service Control Manager (SCM). And you might also want to override the OnPause and OnContinue event handlers as well to handle occasions where the service is paused and resumed.
| Tip |
You can specify if a service can be paused and resumed using the CanPauseAndContinue property of the ServiceBase class; by default, this property is set to False. |
Usually, Windows services run under the System account in Windows (which is not the same as an Administrator account). However, when you install a Windows service, you can use a ServiceProcessInstaller object to set up the service to run in a specific user's account. A single executable file can contain multiple services, but you need an installer for each of them; we'll see how to create Windows services installers when we create a Windows service ourselves. In fact, the Windows services you write in Visual Basic .NET can't install themselves; you have to install them with the InstallUtil.exe tool that comes with Visual Basic.
Let's see how this works in practice. There's an example, WindowsService, on the CD-ROM, and I'll take a look at how that program works here.
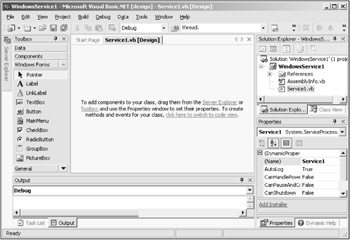
To create a new Windows service project, select the File|New|Project menu item, and this time, select the Windows Service icon in the Templates box of the New Project dialog, giving this new service the name WindowsService. This creates a new Windows service project, as you see in Figure 25.1. The name for this new service, using the default Visual Basic has given it, is "Service1", as you can see in the Properties window in the figure.
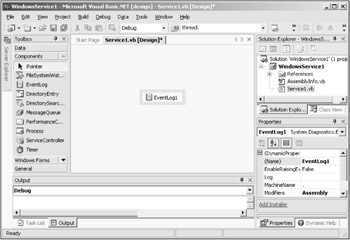
As with any other Visual Basic project, you can design this one visually, at least up to a point. Our Windows service isn't going to do much—it'll just write entries to an event log, in fact, so click the Components tab in the toolbox now and drag an EventLog object to the Windows service, as you see in Figure 25.2. Set the event log's Log property to the name of the log; in this case, I'll use "NewLog1". Also make sure the Windows service's AutoLog property is set to True (which is the default).
EventLog objects let you access Windows 2000 event logs, which record information about software or hardware events. You can read from existing logs, write to logs, delete logs, and handle log entries. In this example, we'll write to our Windows service's event log in the OnStart and OnStop event handlers.
To use an event log, you must specify or create an event source. The source registers your application with the event log as a source of data; the source can be any random string, but the name must be distinct from any other source. I'll register our event log in the Windows service's constructor, which you can find in the "Component Designer generated code" region of the Windows service's code, Service1.vb, and which looks like this originally:
    Public Sub New()
        MyBase.New()

        ' This call is required by the Component Designer.
        InitializeComponent()

        ' Add any initialization after the InitializeComponent() call
    End Sub
In this example, I'll create a source named "Source1". After the new source is created, I'll assign its name to our EventLog object's Source property, like this:
    Public Sub New()
        MyBase.New()
        InitializeComponent()

        If Not EventLog1.SourceExists("Source1") Then
            EventLog1.CreateEventSource("Source1", "NewLog1")
        End If
        EventLog1.Source = "Source1"
    End Sub
Also, set the Source property of the event log to "Source1" in the Properties window. Now we're ready to write to our new event log when the service starts and stops. You can do that in the OnStart and OnStop event handlers, which currently look like this in Service1.vb:
    Protected Overrides Sub OnStart(ByVal args() As String)
        ' Add code here to start your service. This method should set
        ' things in motion so your service can do its work.
    End Sub
    Protected Overrides Sub OnStop()
        ' Add code here to perform any tear-down necessary to stop your
        ' service.
    End Sub
To write to an event log, you use the log's WriteEntry method, and I'll simply insert a message into the log appropriate to the event that's occurred, like this:
    Protected Overrides Sub OnStart(ByVal args() As String)
        EventLog1.WriteEntry("Starting...")
    End Sub

    Protected Overrides Sub OnStop()
        EventLog1.WriteEntry("Stopping...")
    End Sub
Now when the service starts, "Starting..." will be written to the event log NewLog1, and when the service stops, the code will write "Stopping..." to the log.
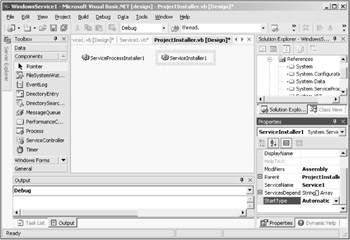
To actually install our Windows service, we'll need an installer, so click the "Add Installer" link in the description section of the Properties window. (This link is visible at bottom right in Figure 25.2.) This creates ProjectInstaller.vb with two objects in it, ServiceProcessInstaller1 and ServiceInstaller1, as you see in Figure 25.3.
ServiceInstaller objects are used by installation utilities to write registry values for the service to a subkey in the HKEY_LOCAL_MACHINE\System\CurrentControlSet\Services registry key. The service itself is identified with its ServiceName value in this subkey. ServiceProcessInstaller objects handle the individual processes launched by your service.
You should indicate the account the service is to run under; in this case, I'll click ServiceProcessInstaller1 and set its Account property to LocalSystem. You also can set this property to LocalService, NetworkService, or User. To set up the service to run under a specific account, you set Account to User. (Be sure to set the Username and Password properties of the ServiceProcessInstaller1 object in that case.)
Next, click the ServiceInstaller1 object and make sure its ServiceName property is set to the name of this service, Service1. You also can use the ServiceInstaller1 object's StartType property to specify how to start the service; here are the possibilities, from the ServiceStartMode enumeration:
Automatic—Specifies that the service is to be started automatically at system startup.
Disabled—Specifies that the service is disabled, which means that it cannot be started.
Manual—Specifies that the service can only be started manually, by either a user using the Service Control Manager, or by an application.
The safest of these while testing a new Windows service is Manual, so set the StartType property of the ServiceInstaller1 object to Manual now.
And that's all it takes—now we'll build and install our new Windows service, Service1. To build the service, just select the Build|Build menu item, which creates WindowsService.exe. To install this service, you use the InstallUtil.exe tool that comes with Visual Basic. (You can also deploy Windows services with setup packages in Visual Basic—see "Deploying Applications" in the In Depth section of this chapter for more information on deploying application.) In Windows 2000 installations, you can usually find InstallUtil.exe in the C:\WINNT\Microsoft.NET\Framework\v xxxxxxxx directory, where xxxxxxxx is a version number. Here's how I install WindowsService.exe using InstallUtil.exe at the command prompt (the command line here in the text is split onto two lines only because it's too long for the page width), and what you see when you do:
C:\WINNT\Microsoft.NET\Framework\v xxxxxxxx >installutil
c:\vbnet\WindowsService\bin\WindowsService.exe
Microsoft (R) .NET Framework Installation utility
Copyright (C) Microsoft Corp 2001. All rights reserved.

Running a transacted installation.

Beginning the Install phase of the installation.
See the contents of the log file for the
c:\vbnet\WindowsService\bin\WindowsService.exe assembly's progress.
The file is located at
c:\vbnet\WindowsService\bin\WindowsService.InstallLog.
Call Installing. on the
c:\vbnet\WindowsService\bin\WindowsService.exe assembly.
Affected parameters are:
   assemblypath = c:\vbnet\WindowsService\bin\WindowsService.exe
   logfile = c:\vbnet\WindowsService\bin\WindowsService.InstallLog
Installing service Service1...
Service Service1 has been successfully installed.
Creating EventLog source Service1 in log Application...

The Install phase completed successfully,
and the Commit phase is beginning.
See the contents of the log file for the
c:\vbnet\WindowsService\bin\WindowsService.exe assembly's progress.
The file is located at
c:\vbnet\WindowsService\bin\WindowsService.InstallLog.
Call Committing. on the c:\vbnet\WindowsService\bin\WindowsService.exe
assembly.
Affected parameters are:
   assemblypath = c:\vbnet\WindowsService\bin\WindowsService.exe
   logfile = c:\vbnet\WindowsService\bin\WindowsService.InstallLog

The Commit phase completed successfully.

The transacted install has completed.
That installs the new Windows service. If the new service hadn't installed successfully, InstallUtil.exe would have rolled the installation back automatically, and removed the non-working service.
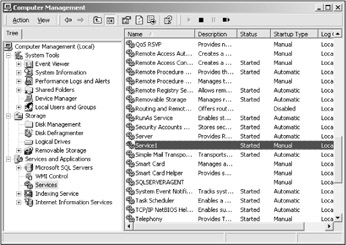
The next step is to use the Service Control Manager to start the service. Here's how you start the SCM in Windows 2000:
In Windows 2000 Professional, right-click My Computer on the desktop, then select the Manage item. In the dialog box that appears, expand the Services and Applications node and find the Services entry.
In Windows 2000 Server, click Start, select Programs, click Administrative Tools, and then click Services.
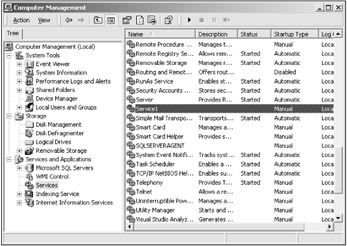
For example, you can see the SCM for Windows 2000 Professional in Figure 25.4. Note that you can already see our service, Service1, listed.
To start the service, right-click Service1 and select the Start item. This starts the service, as you see in Figure 25.5, where Service1 is listed as "Started".
| Tip |
A problematic Windows service can make your computer unusable, so be careful when creating Windows services. Until you're sure a Windows service is working the way you want it to, it's a good idea to keep its start mode as Manual so it doesn't start again automatically if you need to reboot. And make sure that if there's a problem starting the service, the computer doesn't automatically reboot, at least until you're sure the service is working as it should be. To do that in the Service Control Manager, right-click the service, select the Properties item, click the Recovery tab, and make sure the "Take No Action" item is selected for the case where the service fails to start. It's also a good idea to make the service's logic code execute on a different thread than the main thread so the service can still react to Start and Stop events, even if hung. |
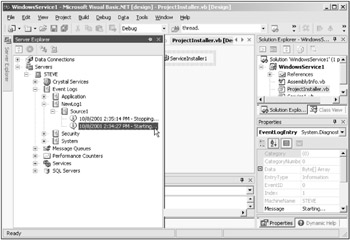
To stop the service, right-click Service1 in the SCM and select Stop. We've now started and stopped our new service, so it should have written to its event log, NewLog1. We can check that from inside Visual Basic—just open the Server Explorer's Event Logs node as you see in Figure 25.6, and check the entry for Source1 in NewLog1, as you see in that figure. You can indeed see the two entries our service has written to the event log, "Starting..." and "Stopping..." in the Server Explorer in Figure 25.6.
And that's it—our new Windows service is a success, and it did what it was supposed to; it's written to the event log. You can uninstall a service like this with InstallUtil.exe—just use the /u option. Here's what you see when you do:
C:\WINNT\Microsoft.NET\Framework\v xxxxxxxx >installutil
c:\vbnet\WindowsService\bin\WindowsService.exe /u

Microsoft (R) .NET Framework Installation utility
Copyright (C) Microsoft Corp 2001. All rights reserved.

The uninstall is beginning.
See the contents of the log file for the
c:\vbnet\WindowsService\bin\WindowsService.exe assembly's progress.
The file is located at
c:\vbnet\WindowsService\bin\WindowsService.InstallLog.
Call Uninstalling. on the
c:\vbnet\WindowsService\bin\WindowsService.exe assembly.
Affected parameters are:
   assemblypath = c:\vbnet\WindowsService\bin\WindowsService.exe
   logfile = c:\vbnet\WindowsService\bin\WindowsService.InstallLog
Removing EventLog source Service1.
Service Service1 is being removed from the system...
Service Service1 was successfully removed from the system.

The uninstall has completed.
That provides the framework you need to create Windows services; now you're able to write behind-the-scenes code for Windows, and keep that code available when it's needed. Next, I'll take a look at creating Web services.
|
| ||
Free JavaScript Editor
JavaScript Editor