JavaScript Editor
JavaScript Debugger
JavaScript Editor
JavaScript Debugger|
| ||
Every Windows user is familiar with menus; you wouldn't get far in Windows without them. Menus are those controls that allow the user to make selections and also hide away those selections when they're not needed, saving space in Windows applications, which is always at a premium. (Imagine replacing all the menu items in a real-world Windows application with buttons in the main window.)
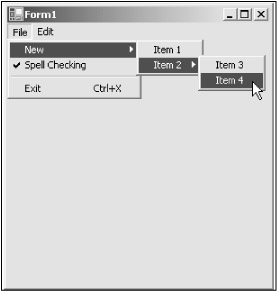
In Visual Basic, the MainMenu control represents the container for the menu structure of a form; you can assign a control of this type to a form's Menu property at run time. Menus are made up of MenuItem objects that represent the individual parts of a menu—menu items can be a parent menu or a menu item in a menu. You can see one of the menu applications we'll develop in this chapter, Menus on the CD-ROM, in Figure 9.1. Here, I've opened the File menu in the menu bar, and opened a submenu two levels deep.
There are all kinds of options here—you can add submenus to menus that will pop up when the user clicks an arrow in a menu item, display check marks, create menu separators (horizontal bars used in menus to group menu items), assign shortcut keys (like Ctrl+H) to menu items, even draw the appearance of menu items yourself. These actions are actually supported by MenuItem objects, not MainMenu objects.
| Tip |
Don't forget that there are many menu conventions in Windows that you should adhere to if you're going to release your programs for public consumption. For example, if a menu item opens a dialog box, you should add an ellipsis (…) after its name (such as Print...). Many shortcuts are already standard, such as Ctrl+S for Save, Ctrl+X for Cut, Ctrl+V for Paste/View, Ctrl+C for Copy, and so on. The File menu should be the first menu, and an Exit item should be at the bottom of that menu. Menus in the menu bar that don't open a menu but instead perform some action immediately, sometimes called bang menus, should have an exclamation point (!) after their names (such as Connect!), and so on. |
|
| ||
Free JavaScript Editor
JavaScript Editor