JavaScript Editor
JavaScript Debugger
JavaScript Editor
JavaScript Debugger|
| ||
The new editor program you've written took a lot of work, and it's a great success. But then you start getting calls from the field-testing department: users want to open more than one document at a time. How do you do that?
You use Multiple Document Interface (MDI) forms. MDI frame windows can display multiple child windows inside them; in fact, the Visual Basic IDE itself is an MDI frame window. Here's an example—called MDI on the CD-ROM for this book. In this example, I'll let the user create new MDI windows, and arrange them just by selecting a menu item. We haven't created menus before, and in fact, we won't work with menu controls in a systematic way until Chapter 9, but MDI applications almost invariably use menus to create new windows and so on, so we'll get a foretaste of menu handling here.
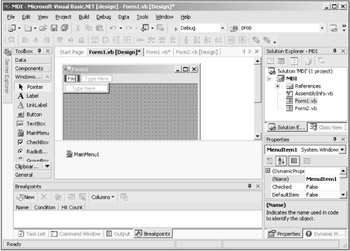
To see how MDI applications work, create a new Windows application now, as shown in Figure 4.13. The main form, Form1, will be our MDI container or parent, containing MDI children, so set its IsMdiContainer property to True. This alters its appearance from a white client area to a gray one; next, drag a MainMenu control from the toolbox onto Form1. This causes a new control, MainMenu1, to appear in the new pane at the bottom of the form designer, as you see in Figure 4.13, and a new menu bar to appear in Form1, with the text "Type Here" in it. To create a File menu, type "File" in the "Type Here" box, as you also see in Figure 4.13.
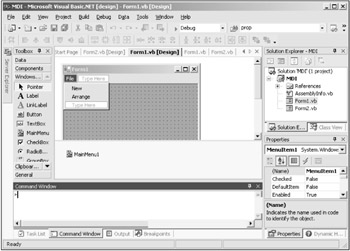
When you create a new File menu, additional "Type Here" boxes appear for the next menu in the menu bar and the first item in the File menu, as you see in Figure 4.13. Add a New item to the File menu; when you do, another "Type Here" box appears beneath that item. Create a new Arrange menu item in that new box, as you see in Figure 4.14.
Now double-click the New item in the File menu to open the event handler for this menu item in code (as you see from this code, the New item is MenuItem2, not MenuItem1; the File menu itself is MenuItem1):
Public Class Form1
    Inherits System.Windows.Forms.Form

'Windows Form Designer generated code

    Private Sub MenuItem2_Click(ByVal sender As System.Object, _
        ByVal e As System.EventArgs) Handles MenuItem2.Click

    End Sub
        ⋮
When the user clicks the New menu item, we want to display a new MDI child window. To do that, create a new form class, Form2, by adding a new form to the project, as we did in the topic "Working with Multiple Forms." (That is, with the Project|Add Windows Form menu item in the VB .NET IDE). We can make these child windows useful by dragging a RichTextBox control onto Form2. Rich text boxes, which we'll see in Chapter 5, support rich format (RTF) text, including all kinds of formatting, from italics to bold text to selecting fonts and colors. This allows you to create mini-word processors in your application. Make sure the rich text box's Multiline property is set to True so it can handle multiline text.
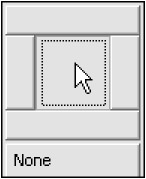
To make sure that the rich text box, RichTextBox1, covers the whole client area of Form2 (the area inside the border and under any tool bars or menu bars), we can dock and anchor it. Docking works as we've already seen in the IDE—when you dock a window, it adheres to the edges of its container. In this case, select the rich text box in the Form2 designer and select its Dock property in the Properties window, opening the window you see in Figure 4.15 on top of the Properties window. To dock the rich text box to all edges of its container, click the button in the middle of Figure 4.15, which sets its Dock property to Fill. You can also do the same thing in code, like this: richTextBox1.Dock = DockStyle.Fill.
| Tip |
You can also set the form's DockPadding property, which sets the padding used between docked controls and the form's edge. |
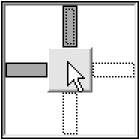
You also can anchor a control to the edges of its container with the Anchor property. Selecting this property opens the window you see in Figure 4.16 on top of the Properties window, and you can select what edge to anchor the control to.
Now that we've created a new form class, Form2, for our MDI child windows, we can create and display a new object of that class each time the user clicks the File|New menu item in our program. To make that new form object a child window of our MDI parent, Form1, all we have to do is to set its MdiParent property to the main window (which also sets its IsMdiChild property to True). Because we'll be working with a number of child windows, I'll store them in an array of forms, incrementing the number of forms each time a new one is created, setting the text in its title bar to "Document1", "Document2", and so on, like this:
Public Class Form1
    Inherits System.Windows.Forms.Form
    Dim NumberForms As Integer = 0
    Dim Forms(10) As Form2

'Windows Form Designer generated code

    Private Sub MenuItem2_Click(ByVal sender As System.Object, _
        ByVal e As System.EventArgs) Handles MenuItem2.Click
        NumberForms += 1
        Forms(NumberForms) = New Form2()
        Forms(NumberForms).Text = "Document" & Str(NumberForms)
        Forms(NumberForms).MdiParent = Me
        Forms(NumberForms).Show()
    End Sub
End Class
| Tip |
As it turns out, there's another way to access all your child MDI forms in an array—use the MdiChildren property of the MDI parent, which returns an array of its MDI child forms. |
All that's left is to enable the File|Arrange menu item in our application. To automatically arrange MDI child windows, you can use the LayoutMdi method:
This Sub procedure takes one argument, value, which is one of the MdiLayout enumeration values that defines the layout of MDI child forms:
ArrangeIcons— All MDI child icons (which are displayed when you minimize an MDI child window) are arranged.
Cascade— All MDI child windows are cascaded.
TileHorizontal— All MDI child windows are tiled horizontally.
TileVertical— All MDI child windows are tiled vertically.
In our example, I'll use the cascade layout, so I add this code to the Arrange menu item's event handler:
    Private Sub MenuItem3_Click(ByVal sender As System.Object, _
        ByVal e As System.EventArgs) Handles MenuItem3.Click
        Me.LayoutMdi(MdiLayout.Cascade)
    End Sub
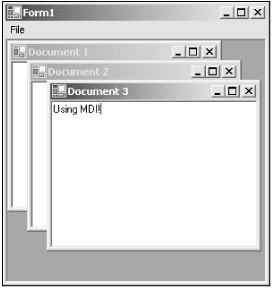
And you can see the results in Figure 4.17—just select the File|New menu item to display a new MDI child, and the File|Arrange menu item to arrange the MDI children.
Now you're using MDI forms!
| Tip |
In Visual Basic, you can use all kinds of forms—including different types in the same application—as MDI children in an MDI window, as long as their MdiParent property is set to the main MDI window. You can also use Show and Hide on those windows to manage them as you like. |
|
| ||
Free JavaScript Editor
JavaScript Editor