JavaScript Editor
JavaScript Debugger
JavaScript Editor
JavaScript Debugger
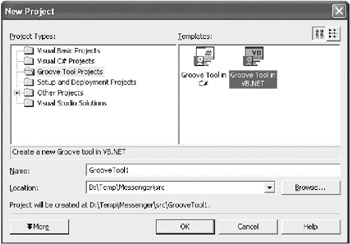
Once you've installed the Groove toolkit for Visual Studio .NET, you'll be able to directly create a Groove project. Simply select Groove Tool Projects ![]() Groove Tool in VB .NET from the Create Project window (see Figure 12-5).
Groove Tool in VB .NET from the Create Project window (see Figure 12-5).
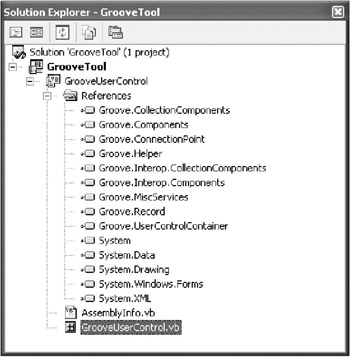
Groove projects resemble user controls. They have a Windows design surface, but no form border (because they're hosted in the transceiver). You can code any valid VB .NET code in a Groove project, including code that interacts with a web service, reads from a database, launches new threads, opens new windows, and so on.
Figure 12-6 shows the contents of a simple Groove project and its assembly references.
| Note |
Behind the scenes, the Groove toolkit makes heavy use of .NET-to-COM interoperability. It uses runtime callable wrappers (RCW) to make its COM library of components available to your .NET applications, and COM callable wrappers (CCW) to wrap your .NET Groove tools so they can be hosted in the unmanaged Groove transceiver. You won't need to deal with this layer of interoperability directly. |
If you look at the auto-generated code for the default Groove user control, you'll see three collapsed regions with Groove code. The first ("Groove member variables") defines two form-level variables:
Private WithEvents propertyList As GroovePropertyList
Private WithEvents recordSetEngine As GrooveRecordSetEngine
The propertyList variable is used to access a small amount of tool-specific information (such as the tool name and assembly). The recordSetEngine variable is used to access data that will be synchronized across all users in the shared space.
Both the property list and record set rely on Groove's persistence engines. Groove provides four persistence engines:
PropertyListEngine. This models data as a series of name and value pairs. You can store any basic type of data (numeric, string, and so on). Property lists are used extensively by Groove to provide information about the environment.
RecordSetEngine. This models a set of records. Each record is divided into multiple fields that can use basic data types such as strings and numbers as well as XML elements. A record set can include many different types of records. This is the most commonly used Groove persistence engine for storing data in a custom tool.
HierarchicalRecordSetEngine. This is similar to the RecordSetEngine, except that it allows you to organize different record sets into a tree-like hierarchy.
DocumentShareEngine. This engine allows you to share files in a distributed space.
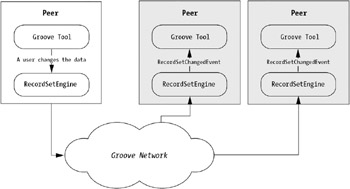
In this example, we'll use the RecordSetEngine to manage shared data. To change data, the application opens a RecordSetEngine transaction and makes the desired changes. The RecordSetEngine then replicates the changes over all the peers in the shared space, using encryption. The change then appears in each local copy of the tool as a RecordSetEngine event. The tool responds to this event and updates the local display accordingly. Figure 12-7 diagrams this arrangement.
Continuing our exploration of the designer code, you'll find a collapsed region named "IGrooveComponent default implementation." It includes a basic implementation of the IGrooveComponent interface, including an Initialize() subroutine that retrieves the property list and some basic information from the Groove environment:
' Common Groove property names.
Private Const CommonPropertyName = "Name"
Private Const CommonPropertyBindableURL = "_BindableURL"
Private Const CommonPropertyCanonicalURL = "_CanonicalURL"
Private Const RecordSetEngineConnection = 0
' Cached Groove property values.
Private componentName As String
Private componentBindableURL As String
Private componentCanonicalURL As String

Public Sub Initialize(ByVal propertyListInterop _
  As Groove.Interop.Components.IGroovePropertyList) _
  Implements Groove.Interop.Components.IGrooveComponent.Initialize

    ' Create the property list wrapper object.
    propertyList = new GroovePropertyList(propertyListInterop)

    componentBindableURL = _
      propertyList.OpenPropertyAsString(CommonPropertyBindableURL)
    componentCanonicalURL = _
      propertyList.OpenPropertyAsString(CommonPropertyCanonicalURL)

    ' This is a GUID that uniquely identifies the tool.
    componentName = propertyList.OpenPropertyAsString(CommonPropertyName)

End Sub
This information is made available through several property procedures that also implement the IGrooveComponent interface:
Public ReadOnly Property BindableURL() As String _
  Implements Groove.Interop.Components.IGrooveComponent.BindableURL
    Get
        Return componentBindableURL
    End Get
End Property

Public ReadOnly Property CanonicalURL() As String _
  Implements Groove.Interop.Components.IGrooveComponent.CanonicalURL
    Get
        Return componentCanonicalURL
    End Get
End Property

Public Function OpenName() As String _
  Implements Groove.Interop.Components.IGrooveComponent.OpenName
    Return componentName
End Function
Finally, the component includes code to create a new RecordSetEngine instance, and disposes of it when the application ends. This manual dispose step is used because the RecordSetEngine is actually a wrapper for a COM component, and therefore it holds unmanaged resources.
Public Sub ConnectToComponent(ByVal componentInterop As _
  Groove.Interop.Components.IGrooveComponent, ByVal connectionID As Integer) _
  Implements Groove.Interop.Components.IGrooveComponent.ConnectToComponent

    Select Case connectionID
        Case RecordSetEngineConnection
            ' Create the recordSetEngine wrapper object.
            Dim recordSetEngineInterop As _
              Groove.Interop.CollectionComponents.IGrooveRecordSetEngine
            recordSetEngineInterop = componentInterop
            recordSetEngine = New GrooveRecordSetEngine(recordSetEngineInterop)
    End Select

End Sub

Public Sub UnconnectFromComponents() _
  Implements Groove.Interop.Components.IGrooveComponent.UnconnectFromComponents
    recordSetEngine.Dispose()
End Sub

Public Sub Terminate() _
  Implements Groove.Interop.Components.IGrooveComponent.Terminate
    propertyList.Dispose()
End Sub
The third and final designer region is used to hold a default implementation of the RecordSetChanged event handler:
Private Sub OnRecordSetChanged(ByVal sender As GrooveRecordSetEngine, _
  ByVal e As GrooveRecordSetListenerEventArgs) _
  Handles recordSetEngine.RecordSetChangedEvent

    ' (By default, no code is included.)

End Sub
The next step is to use this basic framework to add some application-specific logic. At a minimum, a Groove tool allows the user to create and manage some information and responds when this information is changed by updating the display accordingly.
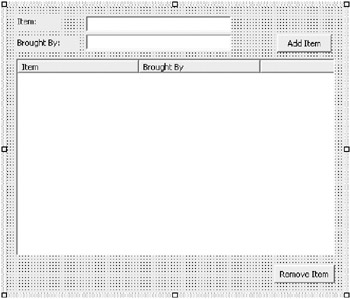
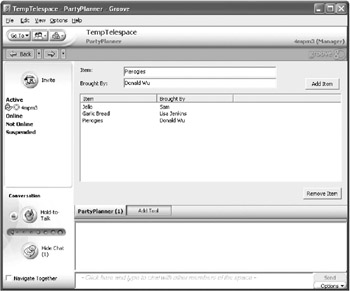
Our simple example is a collaborative party planner. It displays a list of food items that are being brought to the party by various individuals. Any individual in the shared space can add or remove items from this list. The interface (shown in Figure 12-8) includes a ListView and two buttons, one for removing items and one for adding them.
| Tip |
Remember to anchor your controls to the sides of the user control container so they can adapt to fit the space allocated to them in the Groove transceiver.You can also improve your interfaces with docking and splitter bars and other niceties. |
When a user clicks the Add button, the item information is read from the text boxes, added to a new Groove record, and then inserted into the Groove record set.
Private Sub cmdAdd_Click(ByVal sender As System.Object, _
  ByVal e As System.EventArgs) Handles cmdAdd.Click

    ' Verify the item information is present.
    If txtItem.Text = "" Or txtBroughtBy.Text = "" Then
        MessageBox.Show("Enter your name and the item name.")
        Return
    End If

    ' Create a new record to add to the Groove record set.
    Dim Record As New GrooveRecord()

    Try
        ' Set the new field values.
        Record.SetField("Item", txtItem.Text)
        Record.SetField("BroughtBy", txtBroughtBy.Text)

        ' Add the record.
        Me.recordSetEngine.AddRecord(Record)

    Finally
        ' Explicitly release the unmanaged resources held by the record.
        Record.Dispose()
    End Try

End Sub
Note that this code does not actually modify the ListView control—it only changes the Groove record set. The local peer must respond, like all peers in the shared space, to the RecordSetChanged event in order to update the ListView. At this point, the peer reads the information from the record (along with the record ID that's assigned by Groove to uniquely identify this record) and inserts a new ListViewItem. Individual values are read using Record.OpenFieldAsString() method.
Private Sub OnRecordSetChanged(ByVal sender As GrooveRecordSetEngine, _
  ByVal e As GrooveRecordSetListenerEventArgs) _
  Handles recordSetEngine.RecordSetChangedEvent

    Dim RecordID As Double
    Dim Record As IGrooveRecord
    ' The ToolHelper is used to start a new transaction.
    ' This prevents the data from changing while the display is being updated.
    Dim ToolHelper As New GrooveToolHelper(Me.propertyList)
    ToolHelper.StartTelespaceTransaction(True)

    Try
        ' Determine the type of change.
        Select Case e.RecordSetChangeType

            Case GrooveRecordSetChangeType.GrooveRecordSetChangeType_Added

                ' The record set contains one or more items to be added.
                Do While e.RecordIDEnum.HasMore()
                    RecordID = e.RecordIDEnum.OpenNext()
                    If recordSetEngine.HasRecord(RecordID) Then

                        Record = recordSetEngine.OpenRecord(RecordID)
                        Dim Item As New ListViewItem( _
                          Record.OpenFieldAsString("Item"))
                        Item.SubItems.Add(Record.OpenFieldAsString( _
                          "BroughtBy"))
                        lstItems.Items.Add(Item)

                        ' Store the unique record ID.
                        item.Tag = RecordID

                        ' Explicitly release the record.
                        Record.Dispose()
                    End If
                Loop

            ' (The code for other types of changes is omitted.)
    Catch Err As Exception
        ' Abort transaction.
        ToolHelper.AbortTelespaceTransaction()
        MessageBox.Show(Err.Message)

    End Try

End Sub
The Remove button uses similar logic. It verifies that an item is selected, starts a transaction, and removes it from the record set.
Private Sub cmdRemove_Click(ByVal sender As System.Object, _
  ByVal e As System.EventArgs) Handles cmdRemove.Click

    If lstItems.FocusedItem Is Nothing Then
        MessageBox.Show("No item selected.")

    Else
        ' Get the unique record ID.
        Dim RecordID As Double = CType(lstItems.FocusedItem.Tag, Double)

        ' Open a transaction on the telespace to prevent data from
        ' changing out from under us.
        Dim ToolHelper As New GrooveToolHelper(Me.propertyList)
        ToolHelper.StartTelespaceTransaction(False)

        Try
            ' Remove the record.
            Me.recordSetEngine.RemoveRecord(RecordID)
            ToolHelper.CommitTelespaceTransaction()

        Catch Err As Exception
            ToolHelper.AbortTelespaceTransaction()
            MessageBox.Show(Err.Message)

        End Try
    End If

End Sub
Once again, the code reacts to the RecordSetChanged event and uses this opportunity to update the ListView. This time, the code loops through the ListView items until it finds one that matches the unique record ID.
Case GrooveRecordSetChangeType.GrooveRecordSetChangeType_Removed

    ' RecordSet contains one or more items to be removed.
    Do While e.RecordIDEnum.HasMore()
        RecordID = e.RecordIDEnum.OpenNext()

        ' Check the ListView for this item.
        Dim Item As ListViewItem
        For Each Item In lstItems.Items
            If CType(Item.Tag, Double) = RecordID Then
                lstItems.Items.Remove(item)
            End If
        Next
    Loop
This is all the custom code you need to add. The next step is to test the custom Groove tool in the transceiver.
The Groove toolkit allows you to debug your Groove application inside Visual Studio .NET. When you run your Groove project, a special instance of the transceiver will appear with your tool loaded in a new shared space. You can interact with the tool and even set breakpoints or use variable watches in your code. When you close the transceiver, the debugging session will end and you can continue to edit your code.
Figure 12-9 shows the party planner running in Groove.
| Note |
In order to debug your tool, Groove cannot already be running. If it is, shut it down before starting your project. |
Even in a single user environment, you can test all of your code. That's because all peers respond to changes in the exact same way, including the peer that originates the change. For example, in the party planner example, the ListView control isn't updated until the Groove infrastructure notifies the application that the record set has been altered. This is the same process that will happen with any other users working in the same shared space.
For a more detailed multiuser test, you'll need to compile your project, create the Groove XML files that describe it, sign it, and then inject it into the Groove Workspace. This is outside the scope of this book, although it's well-explained in the Groove toolkit documentation.
The current party application treats all peers equivalently. However, in a real peer-to-peer application you almost always want some ability to track user identities and possibly assign different sets of abilities to different types of users. This type of design is possible with Groove's rich class library—provided you know where to work.
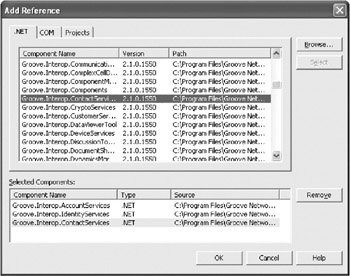
The first step is to import some additional Groove assemblies that you'll need to use to add the identity features. These include Groove.Interop.Account Services, Groove.Interop.IdentityServices, and Groove.Interop.ContactServices, as shown in Figure 12-10. All of these assemblies can be added directly from the global assembly cache.
Using the property list information provided in the Groove environment, you can retrieve two types of information:
Identity information for the user who created the shared space. This user might be given some sort of administrator-like privileges.
Identity information about the current user. This can be used to log changes accurately and even restrict what operations a user is allowed to perform.
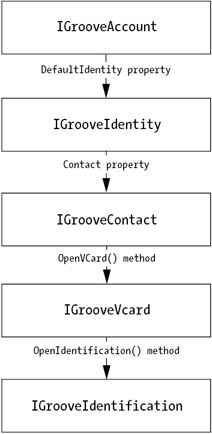
Groove provides several identity-related interfaces, as shown in Figure 12-11. One of the most import is IGrooveIdentity, which allows you to uniquely identify users. Other important interfaces include IGrooveVCard and IGrooveIdentification. IGrooveVCard returns information about the user-specific VCard, which is the Groove equivalent of a digital certificate. The IGrooveIdentification returns a specific subset of VCard information such as the user name, organization, and so on.
Here's how you might retrieve identity information when the shared space is first initialized. In this case, the code retrieves the unique URL identifier for both users and stores them in form-level variables. It also presets the txtBoughtBy text box with the user's name and displays the shared space owner information.
' Track unique identifiers that indicate who created the
' shared space and who is currently using it.
Private UserUrl As String
Private CreatorUrl As String

Private Sub GrooveUserControl_Load(ByVal sender As System.Object, _
  ByVal e As System.EventArgs) Handles MyBase.Load

    ' Define some basic Groove identity interfaces.
    Dim Account As Groove.Interop.AccountServices.IGrooveAccount
    Dim Identity As Groove.Interop.IdentityServices.IGrooveIdentity
    Dim Contact As Groove.Interop.ContactServices.IGrooveContact
    Dim VCard As Groove.Interop.ContactServices.IGrooveVCard
    Dim Identification As Groove.Interop.ContactServices.IGrooveIdentification

    ' Retrieve the identity information for the shared space creator.
    Account = CType(Me.propertyList.OpenProperty("_Account"), _
      Groove.Interop.AccountServices.IGrooveAccount)
    Identity = Account.DefaultIdentity
    Me.CreatorUrl = Identity.URL
    Contact = Identity.Contact
    VCard = Contact.OpenVCard()
    Identification = VCard.OpenIdentification()

    ' Display this identity in the window.
    lblCreator.Text = "Space hosted by: " & Identification.OpenFullName()

    ' Retrieve the identify information for the current user.
    Identity = CType(Me.propertyList.OpenProperty("_CurrentIdentity"), _
      Groove.Interop.IdentityServices.IGrooveIdentity)
    Me.UserUrl = Identity.URL
    Contact = Identity.Contact
    VCard = Contact.OpenVCard()
    Identification = VCard.OpenIdentification()

    ' Pre-fill in the txtBroughtBy textbox.
    txtBroughtBy.Text = Identification.OpenFullName()

End Sub
Now you can add some useful identity integrity features. First of all, you can make the txtBroughtBy textbox read-only, and you can add the user URL information to the record set and ListView. This way, you'll be assured that the user offering to bring a party item is who he or she claims to be.
Here's the updated code for adding new entries:
' Set the new field values.
Record.SetField("Item", txtItem.Text)
Record.SetField("BroughtBy", txtBroughtBy.Text)
Record.SetField("UserURL", Me.UserUrl)
And here's the code that responds to the change and inserts the new ListViewItem:
Record = recordSetEngine.OpenRecord(RecordID)

Dim Item As New ListViewItem(Record.OpenFieldAsString("Item"))
Item.SubItems.Add(Record.OpenFieldAsString("BroughtBy"))
Item.SubItems.Add(Record.OpenFieldAsString("UserURL"))
lstItems.Items.Add(Item)

' Store the unique record ID.
item.Tag = RecordID
Next, you can tweak the code for removing items so that items can't be removed unless the removing user is the user who added the item originally.
Private Sub cmdRemove_Click(ByVal sender As System.Object, _
  ByVal e As System.EventArgs) Handles cmdRemove.Click

    If lstItems.FocusedItem Is Nothing Then
        MessageBox.Show("No item selected.")
    ElseIf lstItems.FocusedItem.SubItems(2).Text <> Me.UserUrl Then
        MessageBox.Show("You did not add this item.")
    Else
        ' (Code omitted.)
    End If
End Sub
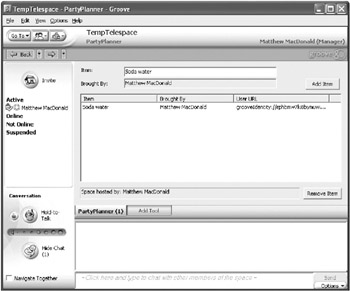
Figure 12-12 shows the revamped Groove tool in action.
This only scratches the surface of some of Groove's more advanced features. For more information, refer to the Groove developer documentation. Keep in mind, however, that the Groove toolkit for Visual Studio .NET is still considered to be a preview of new Groove technology. It will likely change as the COM interoperability code is replaced with native .NET solutions.
Free JavaScript Editor
JavaScript Editor